Introduction
Spectrum is a JUnit 5 and Selenium 4 framework that aims to simplify the writing of e2e tests, providing these features:
- automatic execution video generation
- automatic log and html report generation
- automatic coverage report generation by reading a testbook
- automatic mail/slack notifications with reports as attachments
- reduces flakiness with auto-waiting
- fully configurable providing human-readable and declarative yaml files
- out-of-the-box defaults to let you run tests with no additional configuration
Spectrum leverages JUnit’s extension model to initialise and inject all the needed objects in your test classes, so that you can focus just on writing the logic to test your application.
Spectrum supports both browsers automation via Selenium and mobile and desktop applications via Appium.
Glossary
| Acronym | Meaning |
|---|---|
| AUT | Application Under Test |
| POM | Page Object Model |
| QG | Quality Gate |
| POJO | Plain Old java Object |
Setup
⚠️ JDK
Since Spectrum is compiled with a jdk 21, you need a jdk 21+ to be able to run your tests. If you get anUnsupported major.minor versionexception, the reason is that you’re using an incompatible java version.
Spectrum Archetype
You should leverage the latest published version of the Spectrum Archetype to create a new project either via your IDE or by running this from command line:
mvn archetype:generate -DarchetypeGroupId=io.github.giulong -DarchetypeArtifactId=spectrum-archetype -DarchetypeVersion=LATEST
⚠️ Maven archetype:generate
If you want to tweak the behaviour of the command above, check the official archetype:generate docs.
The project created contains a demo test you can immediately run. If you don’t want to leverage the archetype, you can manually add the Spectrum dependency to your project:
Maven
<dependency>
    <groupId>io.github.giulong</groupId>
    <artifactId>spectrum</artifactId>
    <version>1.24.4</version>
    <scope>test</scope>
</dependency>
Gradle
dependencies {
  testImplementation group: 'io.github.giulong', name: 'spectrum', version: '1.24.4'
}
Test creation
In general, all you need to do is create a JUnit 5 test class extending the SpectrumTest class:
import io.github.giulong.spectrum.SpectrumTest;
import org.junit.jupiter.api.Test;

public class HelloWorldIT extends SpectrumTest<Void> {

    @Test
    public void dummyTest() {
        driver.get(configuration.getApplication().getBaseUrl());
    }
}
After running it, you will find a html report in the target/spectrum/reports folder.
⚠️ Running with Maven
If you run tests with Maven, the name of your test classes should end withITas in the example above (HelloWorldIT), to leverage the default inclusions of the failsafe plugin.
💡 Tip
The default driver ischrome. If you want to use another one, you can switch via the-Dspectrum.driversystem property, setting its value to one of the possible values:
-Dspectrum.driver=chrome-Dspectrum.driver=firefox-Dspectrum.driver=edge-Dspectrum.driver=safari-Dspectrum.driver=uiAutomator2-Dspectrum.driver=espresso-Dspectrum.driver=xcuiTest-Dspectrum.driver=windows-Dspectrum.driver=mac2-Dspectrum.driver=appiumGeneric
💡 Tip
The default log level isINFO. If you want to change it, run with-Dspectrum.log.level=<LEVEL>, for example:
-Dspectrum.log.level=DEBUG-Dspectrum.log.level=TRACE
SpectrumTest and SpectrumPage
These are the two main entities you will need to know to fully leverage Spectrum:
- your test classes must extend SpectrumTest
- your test pages must extend SpectrumPage
💡 Tip
Check the Javadoc for a detailed api description of SpectrumTest, SpectrumPage, and their superclass SpectrumEntity
SpectrumTest
Your test classes must extend SpectrumTest.
As you might have noticed in the examples above, you need to provide a generic parameter when extending it.
That is the Data type of your own. In case you don’t need any,
you just need to set Void as generic.
SpectrumTest extends SpectrumEntity and inherits its fields and methods.
Beyond having direct access to driver, configuration, data, and all the other inherited objects,
by extending SpectrumTest each SpectrumPage that you declare
in your test class will automatically be initialised.
import io.github.giulong.spectrum.SpectrumTest;
import org.junit.jupiter.api.Test;

public class HelloWorldIT extends SpectrumTest<Void> {

    // page class that extends SpectrumPage.
    // Simply declare it. Spectrum will inject it
    private MyPage myPage;

    @Test
    public void dummyTest() {

        // getting direct access to both driver and configuration without declaring
        // nor instantiating them. Spectrum does that for you.
        // Here we're opening the landing page of the AUT
        driver.get(configuration.getApplication().getBaseUrl());

        // assuming in MyPage we have a WebElement named "button", now we're clicking on it
        myPage.getButton().click();
    }
}
💡 Example
Check the tests package to see real examples of SpectrumTests.
SpectrumPage
As per Selenium’s best practices, you should leverage the page object model to represent the objects of the web pages you need to interact with. To fully leverage Spectrum, your pages must extend the SpectrumPage class.
SpectrumPage extends SpectrumEntity and inherits its fields and methods.
Each SpectrumPage takes two generics:
- the page itself
- the
Datatype of your own, the same used as generic in your SpectrumTests.
For example, assuming you need no data, this would be the signature of a page class named WebAppPage:
import io.github.giulong.spectrum.SpectrumPage;

public class WebAppPage extends SpectrumPage<WebAppPage, Void> {
    // ...
}
💡 Example
Check the pages package to see real examples of SpectrumPages.
SpectrumPage Service Methods
By extending SpectrumPage, you inherit few service methods listed here:
-
open():You can specify an endpoint for your pages by annotating them with the
@Endpointannotation:
import io.github.giulong.spectrum.SpectrumPage;
import io.github.giulong.spectrum.interfaces.Endpoint;

@Endpoint("login")
public class WebAppPage extends SpectrumPage<WebAppPage, Void> {
    // ...
}
Then, in your tests, you can leverage the open method. Spectrum will combine the AUT’s base url from the configuration*.yaml with the endpoint:
# configuration.yaml
application:
  baseUrl: http://my-app.com
public class HelloWorldIT extends SpectrumTest<Void> {

    private WebAppPage webAppPage;

    @Test
    public void myTest() {
        webAppPage.open();  // will open http://my-app.com/login
    }
}
Moreover, open will internally call the waitForPageLoading method.
-
waitForPageLoading():This is a method that by default just logs a warning. If you need to check for custom conditions before considering a page fully loaded, you should override this method, so that calling
openon pages will call your implementation automatically.For example, you could have a spinner shown by default when opening pages, and disappearing once the page is fully loaded. You should override the
waitForPageLoadinglike this:
import org.openqa.selenium.WebElement;
import org.openqa.selenium.support.FindBy;
import org.openqa.selenium.support.ui.ExpectedConditions;

import static org.openqa.selenium.support.ui.ExpectedConditions.invisibilityOf;

public class WebAppPage extends SpectrumPage<WebAppPage, Void> {

    @FindBy(id = "spinner")
    private WebElement spinner;

    @Override
    public WebAppPage waitForPageLoading() {
        pageLoadWait.until(invisibilityOf(spinner));

        return this;
    }
}
💡 Tip
Both the open and waitForPageLoading methods return the instance calling them.
This is meant to provide a fluent API, so that you can rely on method chaining.
You should write your service methods with this in mind.
Check FilesIT for an example:
uploadPage
        .open()
        .upload(uploadPage.getFileUpload(),FILE_TO_UPLOAD)
        .getSubmit()
        .click();
-
isLoaded():This is a method to check if the caller page is loaded. It returns a boolean which is true if the current url is equal to the AUT’s base url combined with the page’s endpoint.
public class HelloWorldIT extends SpectrumTest<Void> {

    private WebAppPage webAppPage;

    @Test
    public void myTest() {
        // assuming:
        //  - base url in configuration.yaml is http://my-app.com
        //  - webAppPage is annotated with @Endpoint("login")
        //
        //  will be true if the current url in the driver is http://my-app.com/login
        boolean loaded = webAppPage.isLoaded();
    }
}
SpectrumEntity
SpectrumEntity is the parent class of
both SpectrumTest and SpectrumPage.
Whenever extending any of those, you will inherit its fields and methods.
Spectrum takes care of resolving and injecting all the fields below, so you can directly use them in your tests/pages.
💡 Tip
Check the Javadoc for a detailed api description of SpectrumTest, SpectrumPage, and their superclass SpectrumEntity
| Field | Static | BiDi only | Description |
|---|---|---|---|
| configuration | ✅ | maps the result of the merge of all the configuration*.yaml files. You can use it to access to all of its values |
|
| extentReports | ✅ | instance of the Extent Report | |
| extentTest | instance linked to the section of the Extent Report that will represent the current test. You can use it to add info/screenshots programmatically. | ||
| actions | instance of Selenium Actions class, useful to simulate complex user gestures | ||
| testData | instance of TestData that contains info related to the current test | ||
| driver | instance of the WebDriver running for the current test, configured via the configuration*.yaml |
||
| implicitWait | instance of WebDriverWait with the duration taken from the drivers.waits.implicit in the configuration.yaml |
||
| pageLoadWait | instance of WebDriverWait with the duration taken from the drivers.waits.pageLoadTimeout in the configuration.yaml |
||
| scriptWait | instance of WebDriverWait with the duration taken from the drivers.waits.scriptTimeout in the configuration.yaml |
||
| downloadWait | instance of WebDriverWait with the duration taken from the drivers.waits.downloadTimeout in the configuration.yaml |
||
| eventsDispatcher | ✅ | you can use it to fire custom events | |
| js | instance of Js. Check the Javascript Executor paragraph to see the available Javascript helper methods | ||
| data | maps the result of the merge of all the data*.yaml files. You can use it to access to all of its values |
||
| faker | ✅ | instance of Datafaker | |
| logInspector | ✅ | instance of log inspector | |
| browsingContext | ✅ | instance of browsing context | |
| browsingContextInspector | ✅ | instance of browsing context inspector | |
| network | ✅ | instance of network |
SpectrumEntity Service Methods
⚠️ Methods returning
T
in the list below, theTreturn type means that method returns the caller instance, so you can leverage method chaining.
T hover(WebElement): hovers on the provided WebElement, leveraging theactionsfieldT screenshot(): adds a screenshot at INFO level to the current test in the Extent ReportT screenshotInfo(String): adds a screenshot with the provided message and INFO status to the current test in the Extent ReportT screenshotWarning(String): adds a screenshot status with the provided message and WARN to the current test in the Extent ReportT screenshotFail(String): adds a screenshot with the provided message and FAIL status to the current test in the Extent ReportMedia addScreenshotToReport(String, Status): adds a screenshot with the provided message and the provided status to the current test in the Extent Reportvoid deleteDownloadsFolder(): deletes the download folder (its path is provided in theconfiguration*.yaml)T waitForDownloadOf(Path): leverages the configurabledownloadWaitto check fluently if the file at the provided path is fully downloadedboolean checkDownloadedFile(String, String): leverages thewaitForDownloadOfmethod and then compares checksum of the two files provided. Check the File Download sectionboolean checkDownloadedFile(String): leverages thewaitForDownloadOfmethod and then compares checksum of the file provided. Check the File Download sectionWebElement clearAndSendKeys(WebElement, CharSequence): helper method to call Selenium’sclearandsendKeyson the provided WebElement, which is then returnedT upload(WebElement, String): uploads to the provided WebElement (usually an input field withtype="file") the file with the provided name, taken from the configurableruntime.filesFolder. Check the File Upload sectionboolean isPresent(By): checks if the WebElement with the providedbyis present in the current pageboolean isNotPresent(By): checks if no WebElement with the providedbyis present in the current pageboolean hasClass(WebElement, String): checks if the provided WebElement has the provided css classboolean hasClasses(WebElement, String...): checks if the provided WebElement has all the provided css classes
Drivers and Environments
The two main things you need when running an e2e test are the driver and the environment. Spectrum lets you configure all the supported values in the same configuration file, and then select the ones to be activated either via the same configuration or via runtime properties. Let’s see a configuration snippet to have a clear picture:
# All needed drivers' configurations
drivers:
  waits:
    downloadTimeout: 5
  chrome:
    args:
      - --headless=new
  firefox:
    args:
      - -headless
  edge:
    args:
      - --headless=new
    experimentalOptions:
      binary: /usr/bin/microsoft-edge

# All needed environments' configuration. This is the default environments node,
# so no need to explicitly override this with these values
environments:
  local: { }
  grid:
    url: http://localhost:4444/wd/hub
  appium:
    url: http://localhost:4723/

# Node to select, among other properties, a specific driver and environment. This is the default, no need to explicitly set these.
runtime:
  driver: ${spectrum.driver:-chrome}
  environment: ${spectrum.environment:-local}
💡 Tip
The snippet above leverages interpolation.
As you can see in the snippet above, in the configuration.yaml you can statically configure many drivers such as chrome, firefox, edge and
many environments such as local, grid and appium.
Then, you can choose to run with a specific combination of those, such as firefox on a remote grid,
either via configuration.yaml or via the corresponding runtime property.
| Configuration Node | Selection Node | Selection Property |
|---|---|---|
drivers |
runtime.driver |
-Dspectrum.driver |
environments |
runtime.environment |
-Dspectrum.environment |
Where the columns are:
- Configuration Node: name of the node in the
configuration.yamlto map the configurations of all the possible drivers/environments - Selection Node: name of the node in the
configuration.yamlto select the specific driver/environment to be used - Selection Property: name of the runtime property to select the specific driver/environment to be used
Selecting the driver
You can select the driver via the runtime.driver node. As you can see in the internal
configuration.default.yaml,
its value leverages interpolation with the default set to chrome:
runtime:
  driver: ${spectrum.driver:-chrome}
This means you can either change it directly in your configuration*.yaml by hardcoding it:
runtime:
  driver: firefox
or overriding it at runtime by providing the spectrum.driver property: -Dspectrum.driver=firefox
Before actually providing the list of available drivers, it’s important to spend a few words on the runtime environment.
Selecting the environment
You can select the environment via the runtime.environment node. As you can see in the internal
configuration.default.yaml,
its value leverages interpolation with the default set to local:
runtime:
  environment: ${spectrum.environment:-local}
This means you can either change it directly in your configuration*.yaml by hardcoding it:
runtime:
  environment: grid
or overriding it at runtime by providing the spectrum.environment property: -Dspectrum.environment=grid
Available Drivers and Environments
These are the drivers currently supported, each must be used with a compatible environment:
| Driver | Local | Grid | Appium |
|---|---|---|---|
| chrome | ✅ | ✅ | |
| chromium based | ✅ | ✅ | |
| firefox | ✅ | ✅ | |
| geckodriver based | ✅ | ✅ | |
| edge | ✅ | ✅ | |
| safari | ✅ | ✅ | |
| uiAutomator2 | ✅ | ||
| espresso | ✅ | ||
| xcuiTest | ✅ | ||
| windows | ✅ | ||
| mac2 | ✅ | ||
| appiumGeneric | ✅ |
Configuration
Spectrum is fully configurable and comes with default values which you can find in the configuration.default.yaml. Be sure to check it: each key is properly commented to clarify its purpose. You should also leverage the Json Schema to have autocompletion and fields’ descriptions directly in your IDE.
⚠️ Running on *nix
When running on *nix, the configuration.default.unix.yaml will be merged onto the base one to set filesystem-specific values such as path separators.
To provide your own configuration and customise these values, you can create the src/test/resources/configuration.yaml file in your project.
⚠️ Files Extension
The extension can be either.yamlor.yml. This is valid not only for theconfiguration, but also for all the yaml files you’ll see in this docs, such asdataandtesbookfor instance.
Furthermore, you can provide how many profile-specific configurations in the same folder, by naming them
configuration-<PROFILE>.yaml, where <PROFILE> is a placeholder that you need to replace with the actual profile name of your choice.
To let Spectrum pick the right profiles-related configurations, you must run with the -Dspectrum.profiles flag,
which is a comma separated list of profile names you want to activate.
💡 Example
When running tests with-Dspectrum.profiles=test,grid, Spectrum will merge the files below in this exact order. The first file loaded is the internal one, which has the lowest priority. This means if the same key is provided in any of the other files, it will be overridden. Values in the most specific configuration file will take precedence over the others.
| Configuration file | Priority | Description |
|---|---|---|
| configuration.default.yaml | 1 | Spectrum internal defaults |
| configuration.default.unix.yaml | 2 | Spectrum internal defaults for *nix, not read on Windows |
| configuration.yaml | 3 | Provided by you |
| configuration-test.yaml | 4 | Provided by you. A warning is raised if not found, no errors |
| configuration-grid.yaml | 5 | Provided by you. A warning is raised if not found, no errors |
💡 Tip
There’s no need to repeat everything: configuration files are merged, so it’s better to keep values that are common to all the profiles in the baseconfiguration.yaml, while providing<PROFILE>-specific ones in theconfiguration-<PROFILE>.yaml.In this way, when you need to run with a different configuration, you don’t need to change any configuration file. This is important, since configurations are versioned alongside your tests, so you avoid errors and keep your scm history clean. You then just need to activate the right one by creating different run configurations in your IDE.
⚠️ Merging Lists
Watch out that list-type nodes will not be overridden. Their values will be merged by appending elements! Let’s clarify with an example:
# configuration.yaml
anyList:
  - baseValue

# configuration-test.yaml
anyList:
  - valueForTest

# merged configurations
anyList:
  - baseValue
  - valueForTest
💡 Tip
Working in a team where devs need different local configurations? You can gitignore a file likeconfiguration-personal.yaml, so that everyone can provide their own configuration without interfering with others. Remember to run with-Dspectrum.profiles=personalto activate it!
💡 Example
Check theapplication.baseUrlnode in these configurations used in Spectrum’s own tests to see an example of merging:
- configuration.yaml
- configuration-first.yaml [Actually ignored, active profiles are
localandsecond]- configuration-second.yaml
The very first node of the base
configuration.yamllinked above sets the active profiles, instructing Spectrum to load the other two configurations, and overriding theapplication.baseUrlaccordingly:
runtime:
  profiles: local,second
Values interpolation
Plain values (not objects nor arrays) in configuration*.yaml and data*.yaml can be interpolated with a dollar-string
in one of these two ways, depending on the type needed as result. Let’s suppose we have the variable key = 123:
| Needed type | Interpolation key | Result | Behaviour if not found |
|---|---|---|---|
| String | ${key} |
‘123’ | The placeholder ${key} is returned and a warning is raised |
| Numeric | $<key> |
123 | 0 is returned |
Let’s clarify this with an example where you run behind a proxy. You could store the proxy port as a common variable, and then interpolate it in each driver’s preferences with the proper type:
vars:
  proxyHost: my-proxy.com
  proxyPort: 8080

drivers:
  chrome:
    args:
      - --proxy-server=${proxyHost}:${proxyPort} # proxyPort interpolated as string, numeric interpolation doesn't make sense here
  firefox:
    preferences:
      network.proxy.type: 1
      network.proxy.http: ${proxyHost}
      network.proxy.http_port: $<proxyPort> # proxyPort interpolated as number, since Firefox requires this preference to be numeric
      network.proxy.ssl: ${proxyHost}
      network.proxy.ssl_port: $<proxyPort>
This is the full syntax for values interpolation, where ‘:-’ is the separator
between the name of the key to search for and the default value to use in case that key is not found:
# String example
object:
  myVar: ${key:-defaultValue}

# Number example
object:
  myVar: $<key:-defaultValue>
⚠️ Default value
The default value is optional: you can have just${key}or$<key>. Mind that the default value for numeric interpolation must resolve to a number! If a string is provided, like in the line below, 0 is returned.
$<key:-someStringDefault>→ will return 0 in casekeyis not found.
Spectrum will interpolate the dollar-string with the first value found in this list:
-
vars: key: value - system property:
-Dkey=value - environment variable named
key defaultValue(if provided)
Both key name and default value might contain dots like in ${some.key:-default.value}
⚠️ Combined keys
It’s possible to interpolate multiple string values in the same key, for example:
${key:-default}-something_else-${anotherVar}Nested interpolation works as well, for example if you need a default which is stored in another variable:
${key:-${nestedKey:-default}}-something_else-${anotherVar}It doesn’t make any sense to do the same with numeric interpolation, since the result would be a string. These are not valid:
${key:-default}-something_else-$<anotherVar>$<key:-default>$<anotherVar>If you need to combine strings and numbers, rely on string interpolation only. It doesn’t matter if the original value of these variables is a number. The composed result will always be a string, so use string interpolation only:
${key:-default}-something_else-${anotherVar}${key:-default}${anotherVar}This is the same thing you saw in the proxy example above, where
proxyPortis a number which gets interpolated as a string:
--proxy-server=${proxyHost}:${proxyPort}
💡 Tip
This trick is used in the internal configuration.default.yaml to allow for variables to be read from outside. For example, profiles are set like this:
# internal configuration.default.yaml
runtime:
  profiles: ${spectrum.profiles:-local}
This allows you to just run with
-Dspectrum.profiles=...while having a default, but you can still explicitly set them in yourconfiguration.yaml:
# your configuration.yaml
runtime:
  profiles: my-profile,another-one
You can also choose to provide your own variable, which could be useful to create and leverage your own naming convention for env variables.
# your configuration.yaml
runtime:
  profiles: ${active-profiles:-local}
These are the variables already available in the configuration.default.yaml.
You can add your own and even override the default ones in your configuration*.yaml:
| Variable | Default Windows | Default *nix |
|---|---|---|
| spectrum.profiles | local | local |
| spectrum.driver | chrome | chrome |
| downloadsFolder | ${user.dir}\target\downloads | ${user.dir}/target/downloads |
| summaryReportOutput | target/spectrum/summary | target/spectrum/summary |
| testBookReportOutput | target/spectrum/testbook | target/spectrum/testbook |
Configuring the Driver
Let’s now see how to configure the available drivers in detail, for each the default snippet taken from the internal configuration.default.yaml is provided.
You can provide the configurations of all the drivers
you need in the base configuration.yaml, and then activate the one you want to use in a specific run, as we saw in the
Selecting the Driver section. All the drivers are configured via the drivers node directly under the root of
the configuration.yaml.
Chrome
See https://www.selenium.dev/documentation/webdriver/browsers/chrome/
| Parameter | Type | Description |
|---|---|---|
| args | List<String> | Chrome’s args |
| capabilities | Map<String, Object> | Chrome’s capabilities |
| service | Service | Chrome’s driver service |
drivers:
  chrome:
    args:
      - --disable-search-engine-choice-screen
    capabilities: { }
    experimentalOptions:
      prefs:
        download.prompt_for_download: false
        download.directory_upgrade: true
        download.default_directory: ${downloadsFolder}
        safebrowsing.enabled: true
    service:
      buildCheckDisabled: false
      appendLog: false
      readableTimestamp: false
      logLevel: SEVERE
      silent: false
      verbose: false
      allowedListIps: ''
Chromium Based
As explained in Start browser in a specified location,
you can provide the path to any Chromium based browser in Chrome’s binary capability:
drivers:
  chrome:
    experimentalOptions:
      binary: /Applications/Iron.app/Contents/MacOS/Chromium
    service:
      buildCheckDisabled: true # this is needed if the Chromium based browser is not compatible with the ChromeDriver you have in local
Firefox
See https://www.selenium.dev/documentation/webdriver/browsers/firefox/
| Parameter | Type | Description |
|---|---|---|
| binary | String | Absolute path to the custom Firefox binary to use |
| args | List<String> | Firefox’s args |
| preferences | Map<String, Object> | Firefox’s preferences |
| service | Service | Firefox’s driver service |
drivers:
  firefox:
    binary: null
    args: [ ]
    preferences:
      browser.download.folderList: 2
      browser.download.useDownloadDir: true
      browser.download.dir: ${downloadsFolder}
      browser.helperApps.neverAsk.saveToDisk: application/pdf
      pdfjs.disabled: true
    service:
      allowHosts: null
      logLevel: FATAL
      truncatedLogs: false
      profileRoot: ''
Geckodriver Based
As explained in Start browser in a specified location,
you can provide the path to any Geckodriver based browser in Firefox’s binary parameter:
drivers:
  firefox:
    binary: /Applications/Tor Browser.app/Contents/MacOS/firefox
Edge
See https://www.selenium.dev/documentation/webdriver/browsers/edge/
| Parameter | Type | Description |
|---|---|---|
| args | List<String> | Edge’s args |
| capabilities | Map<String, Object> | Edge’s capabilities |
| service | Service | Edge’s driver service |
drivers:
  edge:
    args: [ ]
    capabilities: { }
    experimentalOptions:
      prefs:
        download.default_directory: ${downloadsFolder}
    service:
      buildCheckDisabled: false
      appendLog: false
      readableTimestamp: false
      logLevel: SEVERE
      silent: false
      verbose: false
      allowedListIps: ''
Safari
See https://www.selenium.dev/documentation/webdriver/browsers/safari/
| Parameter | Type | Description |
|---|---|---|
| service | Service | Safari’s driver service |
drivers:
  safari:
    service:
      logging: false
UiAutomator2
See https://github.com/appium/appium-uiautomator2-driver#capabilities
| Parameter | Type | Description |
|---|---|---|
| capabilities | Map<String, Object> | Android UiAutomator2’s capabilities |
drivers:
  uiAutomator2:
    capabilities: { }
Espresso
See https://github.com/appium/appium-espresso-driver#capabilities
| Parameter | Type | Description |
|---|---|---|
| capabilities | Map<String, Object> | Android Espresso’s capabilities |
drivers:
  espresso:
    capabilities: { }
XCUITest
See https://github.com/appium/appium-xcuitest-driver
| Parameter | Type | Description |
|---|---|---|
| capabilities | Map<String, Object> | iOS XCUITest’s capabilities |
drivers:
  xcuiTest:
    capabilities: { }
Windows
See https://github.com/appium/appium-windows-driver
| Parameter | Type | Description |
|---|---|---|
| capabilities | Map<String, Object> | Windows’ capabilities |
drivers:
  windows:
    capabilities: { }
Mac2
See https://github.com/appium/appium-mac2-driver
| Parameter | Type | Description |
|---|---|---|
| capabilities | Map<String, Object> | Mac2’s capabilities |
drivers:
  mac2:
    capabilities: { }
AppiumGeneric
See https://appium.io/docs/en/latest/intro/drivers/
| Parameter | Type | Description |
|---|---|---|
| capabilities | Map<String, Object> | Appium generic’s capabilities |
drivers:
  appiumGeneric:
    capabilities: { }
Configuring the Environment
Let’s now see how to configure the available environments. You can provide the configurations of all the environments
you need in the same configuration.yaml, and then activate the one you want to use in a specific run, as we saw in the
Selecting the Environment section. All the environments are configured via the environments node directly under the root of
the configuration.yaml:
As a reference, let’s see the environments under the
configuration.default.yaml:
environments:
  local: { }
  grid:
    url: http://localhost:4444/wd/hub
  appium:
    url: http://localhost:4723/
Local environment
The local environment doesn’t have any additional property, which means you need to configure it as an empty object like in the internal default you can see above:
environments:
  local: { }
Watch out that providing no value at all like in “local: ” is equivalent to set “local: null” !
This is generally valid in yaml.
💡 Tip
Since no additional properties are available for the local environment, it doesn’t make any sense to explicitly configure it on your side.
Grid environment
To run on a remote grid, you just need to provide at least the grid url:
environments:
  grid:
    url: https://my-grid-url:4444/wd/hub
    capabilities:
      someCapability: its value
      another: 123
    localFileDetector: true
Where the params are:
| Param | Type | Default | Mandatory | Description |
|---|---|---|---|---|
| url | String | null | ✅ | url of the remote grid |
| capabilities | Map<String,String> | empty map | ❌ | additional driver capabilities to be added to driver-specific ones only when running on a grid |
| localFileDetector | boolean | false | ❌ | if true, allows to transfer files from the client machine to the remote server. Docs |
Appium environment
⚠️ Appium
Appium and all the needed drivers need to be already installed, check the quickstart section in its docs.
Spectrum supports Appium. To run against an Appium server you need to configure the related environment like this:
environments:
  appium:
    url: http://localhost:4723/ # this is the default, no need to provide it explicitly
    capabilities:
      someCapability: its value
      another: 123
    localFileDetector: true
    collectServerLogs: true
    service: # this node and its children are the internal defaults, no need to provide them explicitly
      ipAddress: 0.0.0.0
      port: 4723
      timeout: 20
Appium server is a specialized kind of a Selenium Grid, so its configuration extends the one of the Grid environment above.
When running the Appium server in local, you can either start it manually or let Spectrum do it for you. It’s enough to have Appium installed: if the Appium server is already running, Spectrum will just send execution commands to it. Otherwise, it will start the server process when the tests execution start, and will shut it down once the execution is done.
That said, all the parameters available for a Grid environment can be used in Appium environment. Here’s the list of Appium specific parameters:
| Param | Type | Default | Mandatory | Description |
|---|---|---|---|---|
| collectServerLogs | boolean | false | ❌ | if true, redirect Appium server’s logs to Spectrum’s logs, at the level specified in the drivers.logs.level node |
| service | Service | — | ❌ | arguments to be provided to the AppiumServiceBuilder |
💡 Tip
UsecollectServerLogsonly if you really want to send Appium server’s logs to Spectrum’s log file. When the Appium server is started by Spectrum, its logs are already visible in the same console where you see Spectrum’s logs, since they’re printed on the stout/stderr by default.
If you don’t need any particular configuration, it’s enough to run with:
runtime:
  environment: appium
You can see few working examples in the it-appium module.
Vars node
The vars node is a special one in the configuration.yaml. You can use it to define common vars once and refer to them in several nodes.
vars is a Map<String, String>, so you can define all the keys you need, naming them how you want.
vars:
  commonKey: some-value # commonKey is a name of your choice

node:
  property: ${commonKey} # Will be replaced with `some-value`

anotherNode:
  subNode:
    key: ${commonKey} # Will be replaced with `some-value`
Running Behind a Proxy
In case you’re running behind a proxy, you can see the
ProxyIT
test in the it-grid module. For completeness, let’s report it here as well.
The test is very simple. We’re just checking that a domain in the proxy’s bypass list is reachable, while others are not:
@Test
@DisplayName("should prove that connections towards domains in the proxy bypass list are allowed, while others are not reachable")
public void proxyShouldAllowOnlyCertainDomains() {
    driver.get("https://the-internet.herokuapp.com");    // OK
    assertThrows(WebDriverException.class, () -> driver.get("https://www.google.com"));  // NOT REACHABLE
}
Regarding the proxy, these are the relevant part of its configuration.yaml, where you can see how to configure a proxy server for every driver.
Mind that this is just an example. Its only purpose is to show how to configure a proxy and prove it’s working, leveraging the domain bypass list: there’s no proxy actually running, so trying to reach any domain which is not bypassed would throw an exception.
vars:
  proxyHost: not-existing-proxy.com
  proxyPort: 8080
  proxyBypass: '*.herokuapp.com' # we need to explicitly wrap the string literal since it starts with a special char

drivers:
  chrome:
    args:
      - --proxy-server=${proxyHost}:${proxyPort} # proxyPort interpolated as string, numeric interpolation won't make sense here
      - --proxy-bypass-list=${proxyBypass}
  firefox:
    preferences:
      network.proxy.type: 1
      network.proxy.http: ${proxyHost}
      network.proxy.http_port: $<proxyPort> # proxyPort interpolated as number, since Firefox requires this preference to be numeric
      network.proxy.ssl: ${proxyHost}
      network.proxy.ssl_port: $<proxyPort>
      network.proxy.no_proxies_on: ${proxyBypass}
  edge:
    args:
      - --proxy-server=${proxyHost}:${proxyPort}
      - --proxy-bypass-list=${proxyBypass}
Auto-waiting
Spectrum runs some expected conditions before interacting with web elements to highly reduce flakiness. For example, when you click on an element, it checks that to be clickable before actually trying to click it. Spectrum also scrolls automatically to the element, in order to bring it into the viewport. If this is not possible, for example when the element is in an inactive JQuery tab, this action is skipped.
The auto-wait is enabled by default and runs expected conditions with a 30s timeout. You can override these in you configuration*-yaml.
This is the auto node in the internal
configuration.default.yaml:
drivers:
  waits:
    auto: # Auto-wait configuration
      enabled: true # Whether to enable the auto-wait
      timeout: 30 # Timeout in seconds
This is the set of actions and conditions run before the corresponding action:
| Action | Scroll | Visible | Enabled |
|---|---|---|---|
| click | ✅ | ✅ | ✅ |
| submit | ✅ | ✅ | ✅ |
| sendKeys | ✅ | ✅ | ✅ |
| clear | ✅ | ✅ | ✅ |
| getTagName | ✅ | ✅ | ✅ |
| getAttribute | ✅ | ✅ | ✅ |
| isSelected | ✅ | ✅ | ✅ |
| isEnabled | ✅ | ✅ | ❌ |
| getText | ✅ | ✅ | ✅ |
| getLocation | ✅ | ✅ | ✅ |
| getSize | ✅ | ✅ | ✅ |
| getCssValue | ✅ | ✅ | ✅ |
WebDriver BiDi
Spectrum supports WebDriver BiDi.
By default, as you can see in the internal
configuration.default.yaml,
BiDi is disabled and Chrome DevTools Protocol (CDP) is enabled instead. To enable BiDi, you may choose one of these options in your configuration.yaml:
-
With the
biDiproperty for all drivers:drivers: biDi: true -
With the
biDiproperty for a single driver, if you need driver-specific configurations:drivers: chrome: biDi: true firefox: biDi: false # explicitly set to false though not needed since it's the default -
With the native Selenium capability for a single driver:
 drivers:
   chrome:
     capabilities:
       webSocketUrl: true
Besides enabling the BiDi protocol, you will also get the following objects automatically injected. You don’t need to manually instantiate them, nor to wrap them in a
try-with-resources block: if they’re autocloseable, Spectrum will close them after the execution.
You can find the examples provided in the it-bidi module.
Log Inspector
Log inspector for console logs. Selenium Docs. Example:
@Test
@SneakyThrows
void testListenToJavascriptLog() {
    final CompletableFuture<JavascriptLogEntry> future = new CompletableFuture<>();
    logInspector.onJavaScriptLog(future::complete);

    driver.get("https://www.selenium.dev/selenium/web/bidi/logEntryAdded.html");
    driver.findElement(By.id("jsException")).click();

    final JavascriptLogEntry logEntry = future.get(5, SECONDS);

    assertEquals("Error: Not working", logEntry.getText());
    assertEquals("javascript", logEntry.getType());
    assertEquals(ERROR, logEntry.getLevel());
}
Browsing Context
browsing context of the default window. Selenium Docs. Example:
@Test
void testGetTreeWithAChild() {
    browsingContext.navigate("https://www.selenium.dev/selenium/web/iframes.html", COMPLETE);

    final List<BrowsingContextInfo> contextInfoList = browsingContext.getTree();

    assertEquals(1, contextInfoList.size());

    final BrowsingContextInfo info = contextInfoList.getFirst();
    assertEquals(1, info.getChildren().size());
    assertEquals(driver.getWindowHandle(), info.getId());
    assertTrue(info.getChildren().getFirst().getUrl().contains("formPage.html"));
}
Browsing Context Inspector
Browsing context inspector of the default window. Selenium Docs. Example:
@Test
@SneakyThrows
void canListenToWindowBrowsingContextCreatedEvent() {
    final CompletableFuture<NavigationInfo> future = new CompletableFuture<>();

    browsingContextInspector.onDomContentLoaded(future::complete);
    browsingContext.navigate("https://www.selenium.dev/selenium/web/bidi/logEntryAdded.html", COMPLETE);

    final NavigationInfo navigationInfo = future.get(5, SECONDS);
    assertTrue(navigationInfo.getUrl().contains("bidi/logEntryAdded"));
}
Network
Instance to issue network commands and listen to network events. Selenium Docs. Example:
@Test
void canRemoveIntercept() {
    String intercept = network.addIntercept(new AddInterceptParameters(BEFORE_REQUEST_SENT));
    assertNotNull(intercept);
    network.removeIntercept(intercept);
}
Javascript Executor
Generally speaking, Javascript execution should be avoided: a Selenium test should mimic a real user interaction with the AUT, and a user would never run scripts (unless they want to try hacky things on the frontend application, of course). That said, there are some scenarios where there is no option rather than delegating the execution to Javascript, e.g. Safari not doing what it’s expected to with regular Selenium methods.
For such scenarios, Spectrum injects the js object you can use to perform basic operations with Javascript, instead of relying on the
regular Selenium API. Each method available replicates the methods of the original
WebElement interface.
You can check the
Js javadocs for details and the
JavascriptIT
test to see real examples of all the js methods in action. For completeness, we’re reporting one here:
@Test
public void testInputFieldActions() {
driver.get(configuration.getApplication().getBaseUrl());
js.click(landingPage.getFormLoginLink());
loginPage.waitForPageLoading();
final WebElement usernameField = loginPage.getUsername();
final WebElement passwordField = loginPage.getPassword();
final WebElement form = loginPage.getForm();
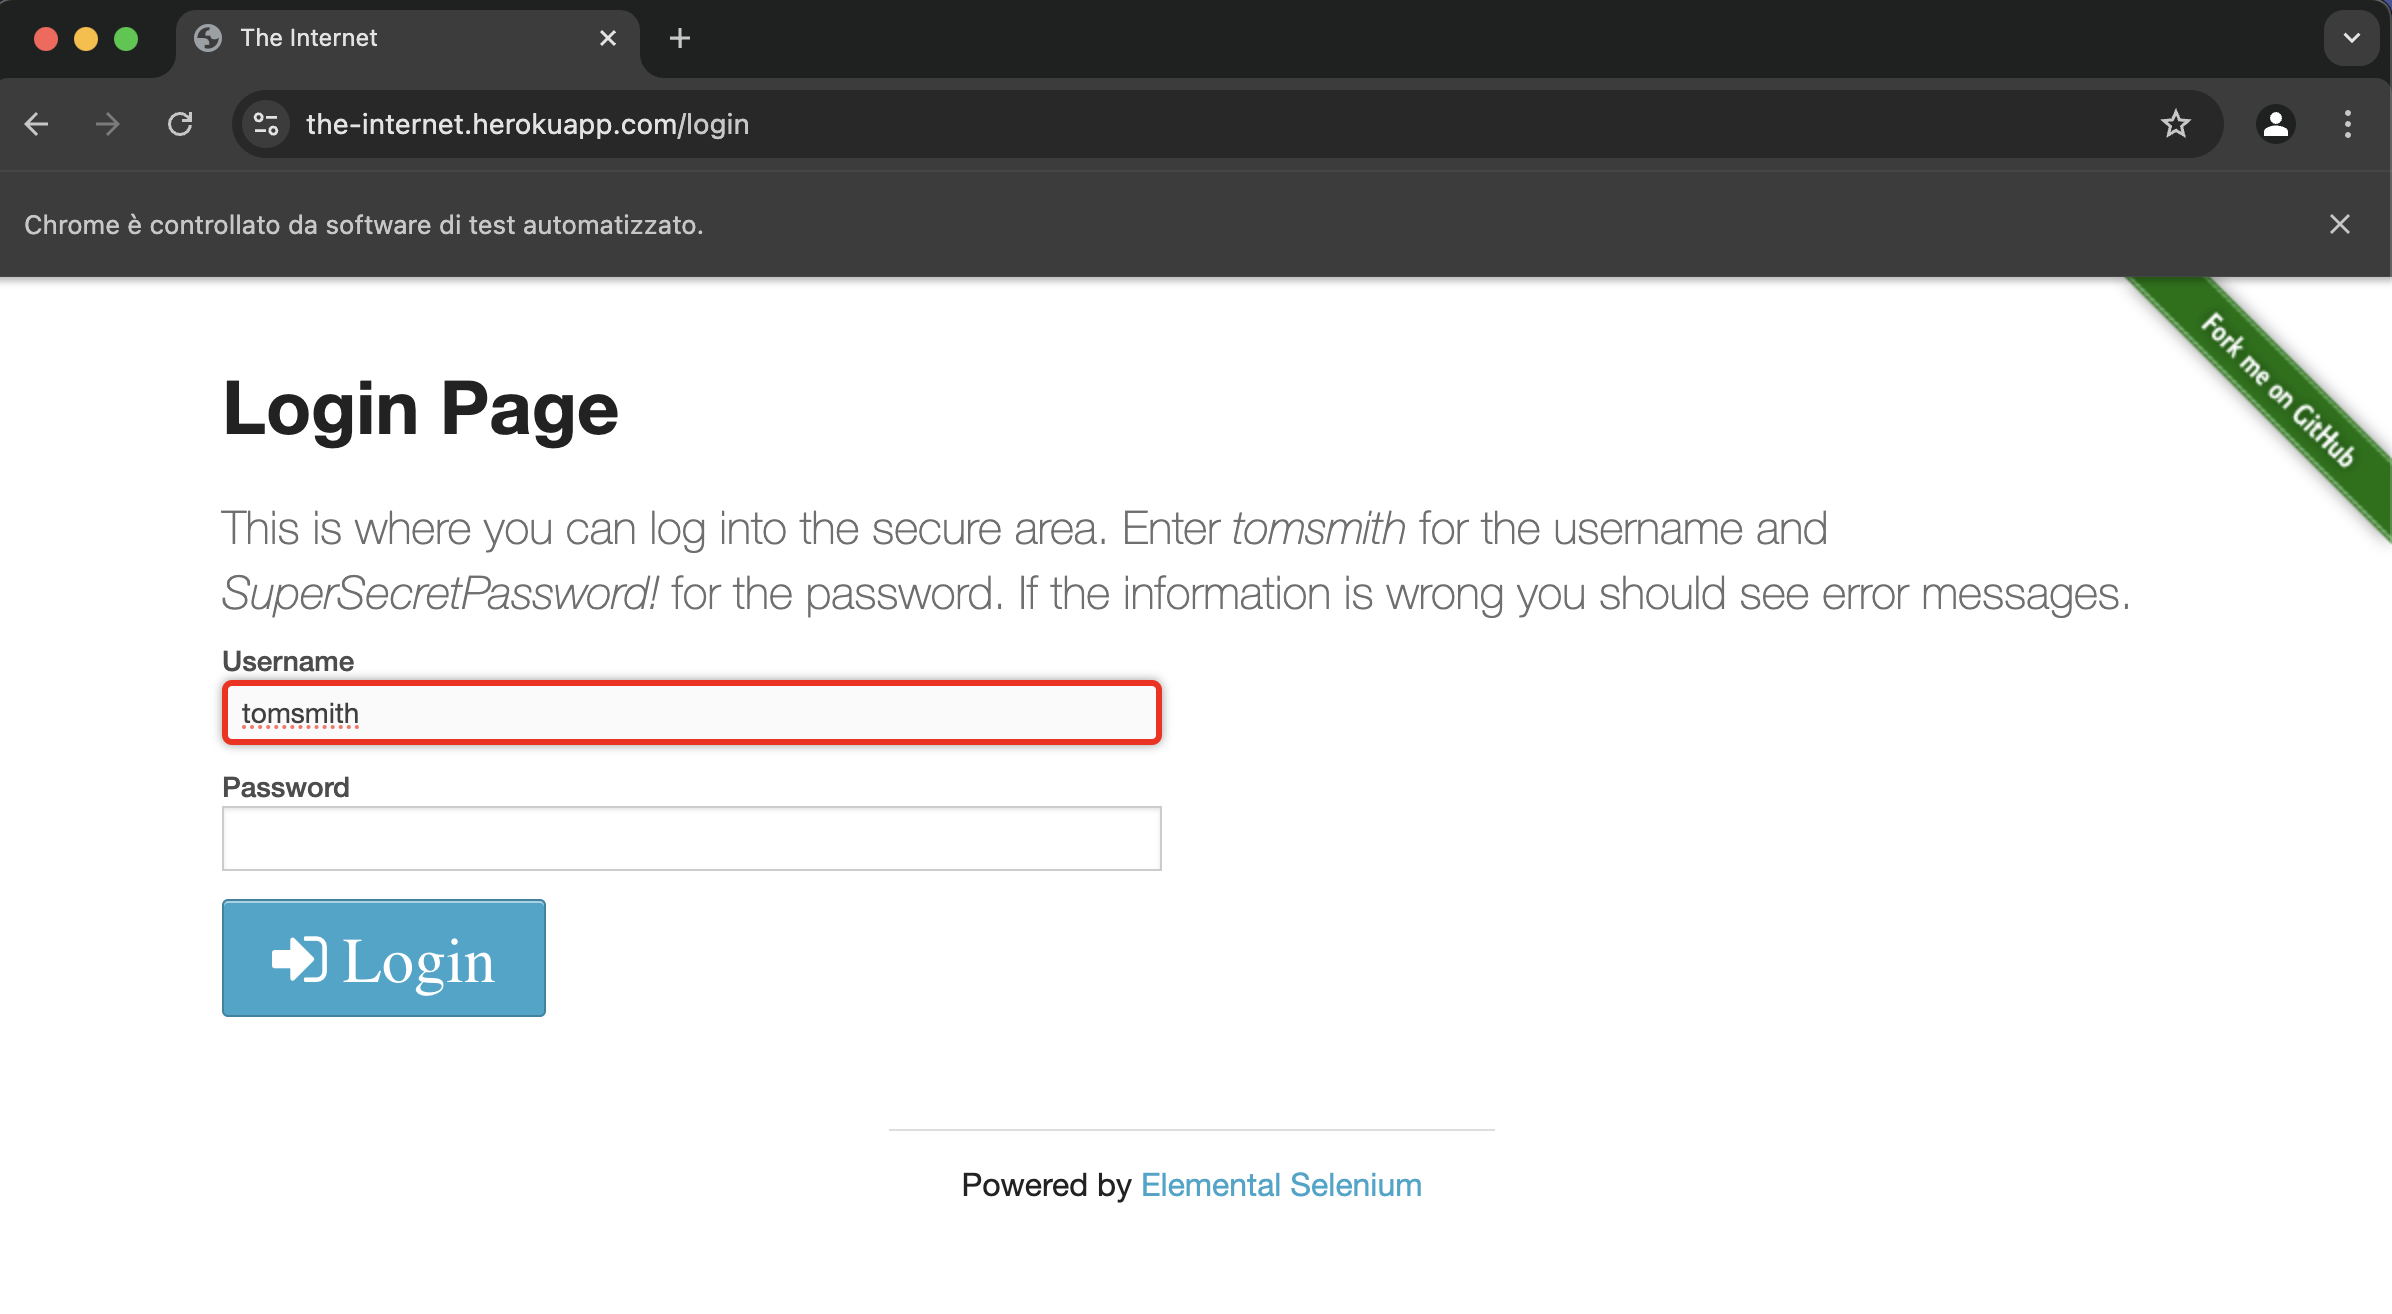
js.sendKeys(usernameField, "tomsmith");
js.clear(usernameField);
assertTrue(js.getDomProperty(usernameField, "value").isEmpty());
js.sendKeys(usernameField, "tomsmith");
js.sendKeys(passwordField, "SuperSecretPassword!");
js.submit(form);
pageLoadWait.until(urlToBe("https://the-internet.herokuapp.com/secure"));
assertEquals("https://the-internet.herokuapp.com/secure", driver.getCurrentUrl());
}
⚠️ WebDriver Events
Sincejsrelies on JavaScript to interact with theAUT, regular events such as those when clicking buttons or filling forms won’t be fired. The only events emitted arebeforeExecuteScriptandafterExecuteScript, so be sure to configure those if you want to rely on automatic screenshots and video generation.
⚠️ Methods not supported
Currently, thejsobject doesn’t support these WebElement methods:
- getAriaRole
- getAccessibleName
- getScreenshotAs
JsWebElement
If you find yourself frequently running Javascript to interact with a particular web element,
you should probably annotate it with @JsWebElement like this:
// applied on a single WebElement
@FindBy(tagName = "h1")
@JsWebElement
private WebElement title;

// applied on a list of WebElements, the annotation is the same
@FindBys({
        @FindBy(id = "wrapper-id"),
        @FindBy(tagName = "input")
})
@JsWebElement
private List<WebElement> inputFields;
By applying the @JsWebElement annotation, each interaction with the annotated web element will be executed in the corresponding Javascript
way. This means you don’t need to do anything programmatically, the annotation on the field is enough:
by calling any regular webElement method on the fields above, such as title.getText() or inputFields.getFirst().sendKeys("username"),
the execution will actually be delegated to the js object, and will behave as explained in the Javascript Executor paragraph.
This means that:
title.getText()will behave asjs.getText(title)inputFields.getFirst().sendKeys("username")will behave asjs.sendKeys(inputFields.getFirst(), "username")
Remember: you just need to annotate the webElement(s) with @JsWebElement and Spectrum will take care of interacting with the annotated
webElement(s) via Javascript. That’s it!
Be sure to check the JsWebElementIT to see some working example tests.
⚠️ WebDriver Events
Since elements annotated with@JsWebElementrelies on JavaScript to interact with theAUT, regular events such as those when clicking buttons or filling forms won’t be fired. The only events emitted arebeforeExecuteScriptandafterExecuteScript, so be sure to configure those if you want to rely on automatic screenshots and video generation.
Secured WebElements
Some web elements could be used for sensitive data, such as passwords input fields.
Given Spectrum intercepts web driver’s events, it might happen that some events,
such as beforeSendKeys and afterSendKeys, send sensitive data to logs and html report in plain text.
To avoid this, you just need to decorate the sensitive web elements with @Secured, and the sensitive data will be redacted
with [***]. The replacement will only affect events’ consumers such as logs and html report,
of course the actual value will still be sent to or read from the web element.
import io.github.giulong.spectrum.interfaces.Secured;

@FindBy(id = "password")
@Secured
private WebElement password;
💡 Example
Given you executepassword.sendKeys("SuperSecretPassword!");this is what is going to be logged if thebeforeSendKeysevent gets consumed:
- without
@Secured→ “Sending keys [SuperSecretPassword!] to id: password”- with
@Secured→ “Sending keys [***] to id: password”
Highlight WebElements
For debugging purposes or in general to have a visual feedback, it might be useful to highlight the web elements your test interacts with. You just need to configure this:
application:
  highlight: { }
This is the highlight node in the internal
configuration.default.yaml:
application:
  highlight:
    js: js/highlight.js # Path to the js used to highlight. Relative to the resources folder
The js property points to the javascript to apply to the web elements. No need to provide it explicitly if you
don’t need to customise it. This is the internal
highlight.js,
that applies a 3px red border for 500ms to the web elements, as in the screenshot below:
const border = arguments[0].style.border;
const borderRadius = arguments[0].style.borderRadius;

arguments[0].style.border = '3px solid red';
arguments[0].style.borderRadius = '5px';

setTimeout(() => {
    arguments[0].style.border = border;
    arguments[0].style.borderRadius = borderRadius;
}, 500);
For instance, providing this custom src/test/resources/highlight.js that puts a red background without removing it, you can achieve the effect in the video below:
arguments[0].style.borderRadius = '5px';
arguments[0].style.background = '#cc0000';
⚠️ Disclaimer
Spectrum uses itself to test its behavior. The video above is produced by the ExtentReportVerifierIT.java, in which Spectrum tests that the generated report contains all the expected elements in the right places, highlighted in red in the video for demonstration purposes.
Highlighting is bound to WebDriver Events, meaning only events occurring at a proper log level
will lead to highlighting the corresponding web element(s). For instance, the beforeSendKeys event is logged at INFO
by default, and this is why the input field in the screenshot above was highlighted:
- some text is being sent to an input field
- the web driver fires the
beforeSendKeysevent - the
beforeSendKeysevent is configured at levelINFO, and the default log level isINFO - Spectrum consumes the event, highlighting the input
If you’d like to customise the js applied when highlighting, you have 2 options where to place your own script:
- at the
js/highlight.jspath, overriding the default, or - at a custom path, setting it explicitly in your configuration*.yaml
JSON Schema
JSON Schema really comes in handy when editing configuration*.yaml, since it allows you to have autocompletion
and a non-blocking validation (just warnings).
This is the list of the available schemas, be sure to pick the right one according to the version of Spectrum you are using.
💡 Tip
You can either download the file or copy the path to reference it in your IDE. Check how to configure JSON Schema for IntelliJ Idea and VSCode
| Version | Full Path | Copy URL |
Older Versions
| Version | Full Path | Copy URL |
WebDriver Events Listener
Spectrum
decorates the webDriver
with an events listener used to automatically take actions such as logging and generating reports.
You can tweak each event in your configuration.yaml, by providing these:
| Key | Type | Default | Description |
|---|---|---|---|
| level | Level | null |
Level at which this event will be logged |
| message | String | null |
Message to be logged upon receiving this event |
| wait | long | 0 |
Milliseconds to wait before listening to this event |
For example, you can set these:
drivers:
  events:
    beforeFindElement:
      level: INFO
      message: Finding element %2$s
      wait: 1000
    beforeClose:
      level: DEBUG
      message: Closing...
Check the drivers.events node in the
configuration.default.yaml
to see the defaults.
Event Level
The available values for the level property are: ERROR, WARN, INFO, DEBUG, TRACE. Let’s check the default value of the click events:
drivers:
  events:
    beforeClick:
      level: INFO
      message: Clicking on <code>%1$s</code>
    afterClick:
      message: Clicked on <code>%1$s</code>
The configuration snippet above means that the beforeClick event is logged at INFO by default, while afterClick isn’t logged at all.
If you want to completely turn off the beforeClick event, you need to explicitly set it to null, which in yaml is done by not specifying any value:
drivers:
  events:
    beforeClick:
      level:
      message: Clicking on <code>%1$s</code>
Event message
The message property specifies what to add to logs and reports upon receiving the related event,
and is affected by the level property. Check the Automatically Generated Reports section below.
Event wait
On the other hand, wait is a standalone property, meaning it will be considered even if the related event won’t be logged,
and specifies how many milliseconds to wait before actually processing the related event.
⚠️ Static waits
If you leverage thewaitproperty, a staticThread.sleepcall is executed. This property is here for convenience, for example to be used if you have flaky tests, and you need a quick way to slow down the execution. In general, you should leverage better waiting conditions, such as fluent waits, as explained in Selenium’s Waiting Strategies docs.
As an example, you might want to add a 1 second sleep before each call like this:
drivers:
  events:
    beforeAnyWebDriverCall:
      wait: 1000
Or a sleep only before clicking elements:
drivers:
  events:
    beforeClick:
      wait: 1000
Automatically Generated Reports
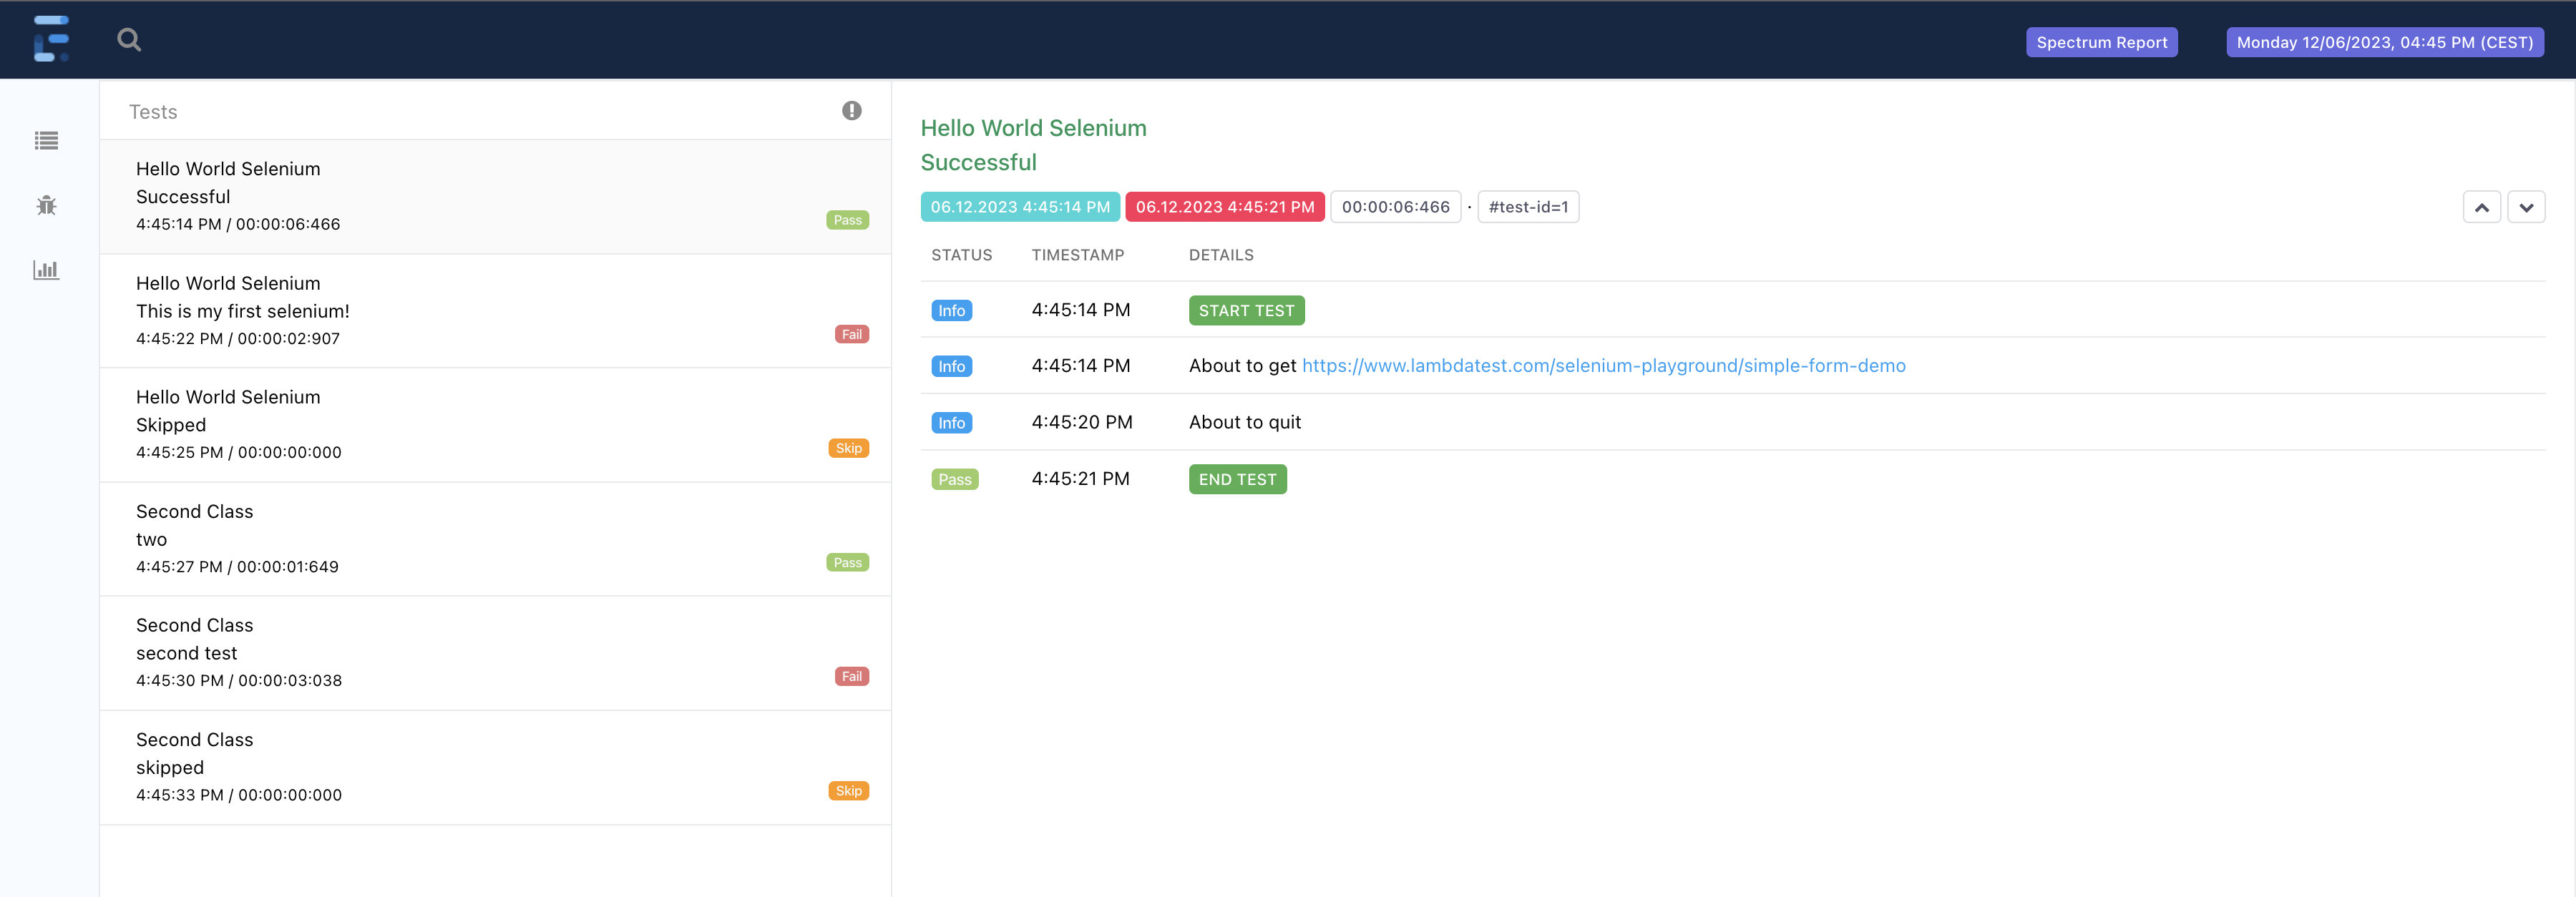
After each execution, Spectrum produces two files:
The WebDriver fires events that are automatically logged and added to the html report.
Check the drivers.events node in the
configuration.default.yaml
to see the defaults log levels and messages.
Remember that the log level is set with -Dspectrum.log.level and defaults to INFO.
Each event with a configured log level equal or higher than the one specified with -Dspectrum.log.level will be logged and added to the html report.
Needless to say, you can also log and add info and screenshots to html report programmatically.
Log file
The log file will contain the same information you see in the console. It will be produced by default under the target/spectrum/logs folder.
It’s generated using Logback, and here you can find its configuration. Logs are rotated daily, meaning the results of each execution occurred in the same day will be appended to the same file.
💡 Tip
By default, logs are generated using a colored pattern. In case the console you use doesn’t support it (if you see weird characters at the beginning of each line), you should deactivate colors by running with-Dspectrum.log.colors=false.
💡 Tip
You can provide your own log configuration by adding thesrc/test/resources/logback-test.xml. This file will completely override the one provided by Spectrum
Html report
Spectrum generates a html report using Extent Reports.
By default, it will be produced under the target/spectrum/reports folder.
Check the extent node in the configuration.default.yaml to see
how to customise it.
💡 Tip
The default file name of the produced html report contains a timestamp, which is useful to always generate a new file. While developing, it could be worth it to override theextent.fileNameto have a fixed name. This way the report will be overridden, so you can keep it open in a driver and just refresh the page after each execution.
You can see an example report here:
💡 Tip
You can provide your own look and feel by putting:
- additional css rules in the
src/test/resources/css/report.cssfile- additional css rules in the
src/test/resources/js/report.jsfileSpectrum will automatically load and apply them to the Extent Report. You can also customise the folder and name of the files above by changing the
extent.cssandextent.jskeys in yourconfiguration*.yaml. This is indeed the default in the internal configuration.default.yaml:
extent:
  css: css/report.css # Path to the custom css to apply. Relative to the resources folder
  js: js/report.js # Path to the custom js to apply. Relative to the resources folder
Upon a test failure, Spectrum adds a screenshot to the report automatically.
You can also add logs to the report programmatically. Check the SpectrumEntity Service Methods section for details.
For example, to add a screenshot with a message at INFO level to the dummyTest:
public class HelloWorldIT extends SpectrumTest<Void> {

    @Test
    public void dummyTest() {
        screenshotInfo("Custom message");
    }
}
The html report, as well as any other file produced (testbook, summary, …)
can be automatically opened at the end of the execution. You simply need to set the extent.openAtEnd flag, and the file
will be opened in the default application you set for that file extension. This means that unless you overrode the default,
html files will be opened in the web browser.
extent:
  openAtEnd: true
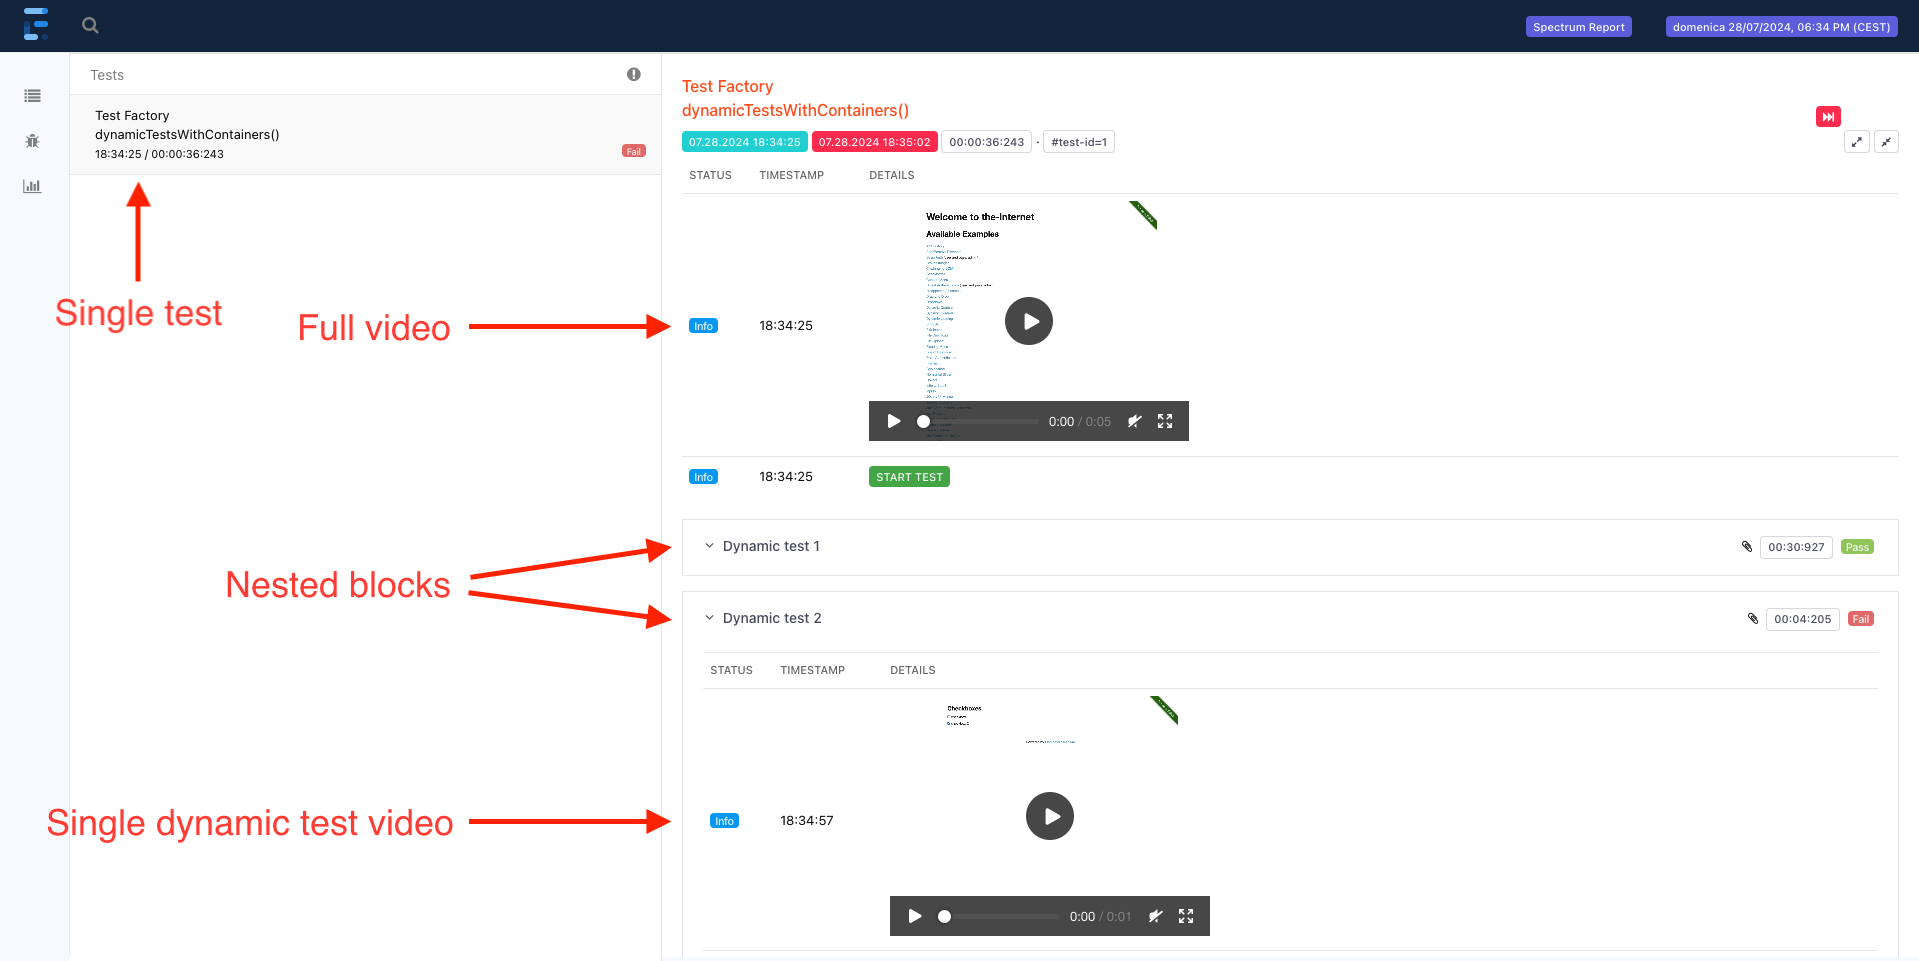
⚠️ Dynamic Tests
Dynamic Tests are shown in the html report as a single one in the left column. In the test’s details on the right, you’ll see one collapsible nested block for each dynamic test. Additionally, if you enabled video generation, you’ll find the full video attached on top of the right column, as well as the video related to the specific dynamic test execution in its own nested block.The example report shown here is the one generated from TestFactoryIT.java.
Inline report
The generated html report embeds external resources such as images and videos. You can optionally choose to produce an inline report, that will be exactly the same, but with all the external images and videos replaced with their Base64 encoded data.
This is particularly useful if you want to send the html report to someone else, without packing it with the associated folder containing all the external resources.
💡 Tip
Check the Mail Consumer section to see how to send the inline report as an attachment to an email.
To generate the inline report, you need to set the extent.inline key to true. By default, the inline report will be
generated in the target/spectrum/inline-reports folder. You can optionally override that as well with the corresponding
property, as you can see here:
extent:
  fileName: report.html # this is the name of both the regular report and the inline one
  inline: true
  inlineReportFolder: target/spectrum/inline-reports # This is the default, no need to add it in your configuration
⚠️ Reports names
Mind that the inline report has the same name of the regular one, so it’s important to have them generated in separate folders not to override each other.
Tests order
By default, tests are shown in the html report in the order of execution. You can override this behaviour via the extent.sort key,
which accepts an object.
💡 Tip
Providing a fixed sorting can be particularly useful when running tests in parallel, so that they’re shown in the same order regardless of the execution randomness.
The available sorters are:
noOp: leaves the tests in the order of execution. This is the default, as you can see in the internal configuration.default.yaml:
extent:
  sort: # How to sort tests in the produced report
    noOp: { } # By default, no sort is applied
name: sorts tests alphabetically by their name
extent:
  sort:
    name: { }
status: sorts tests by their status (passed, failed…). You can decide which to show first via theweightsmap.
extent:
  sort:
    status:
      weights: # Weights of tests statuses. A lower weight means the test is shown before those with a higher one in the Extent report
        INFO: 10
        PASS: 20
        WARNING: 30
        SKIP: 40
        FAIL: 50
⚠️ Default weights
The weights shown in the snippet above are the default, meaning passed tests are shown before skipped ones, which in turn are shown before those that failed. If this order is fine for you, there’s no need to explicitly provide those weights. You can just write:
extent:
  sort:
    status: { }
Custom locators
Selenium doesn’t provide any way to get a webElement’s locator, by design. So, Spectrum extracts the locator from the webElement.toString().
You can leverage the extent.locatorRegex property to extract the important bits
out of it, using the capturing group (the one wrapped by parentheses).
For example, for a field annotated like this:
@FindBys({
        @FindBy(id = "checkboxes"),
        @FindBy(tagName = "input")
})
private List<WebElement> checkboxes;
this would be the full toString():

The regex in the configuration.default.yaml is:
locatorRegex: \s->\s([\w:\s\-.#]+)
which extracts just this (mind the capturing group above):

For example, if you want to shrink it even more, you could add this as extent.locatorRegex in your configuration.yaml:
locatorRegex: \s->[\w\s]+:\s([()^\w\s\-.#]+)
and you’d see this:

Automatic Execution Video Generation
Spectrum can generate the video of the execution of each single test, leveraging JCodec. By default, this is disabled,
so you need to explicitly activate this feature in your configuration.yaml. Check the video node in the internal
configuration.default.yaml
for all the available parameters along with their details.
Once enabled, the video is attached to the extent report as the very first element:
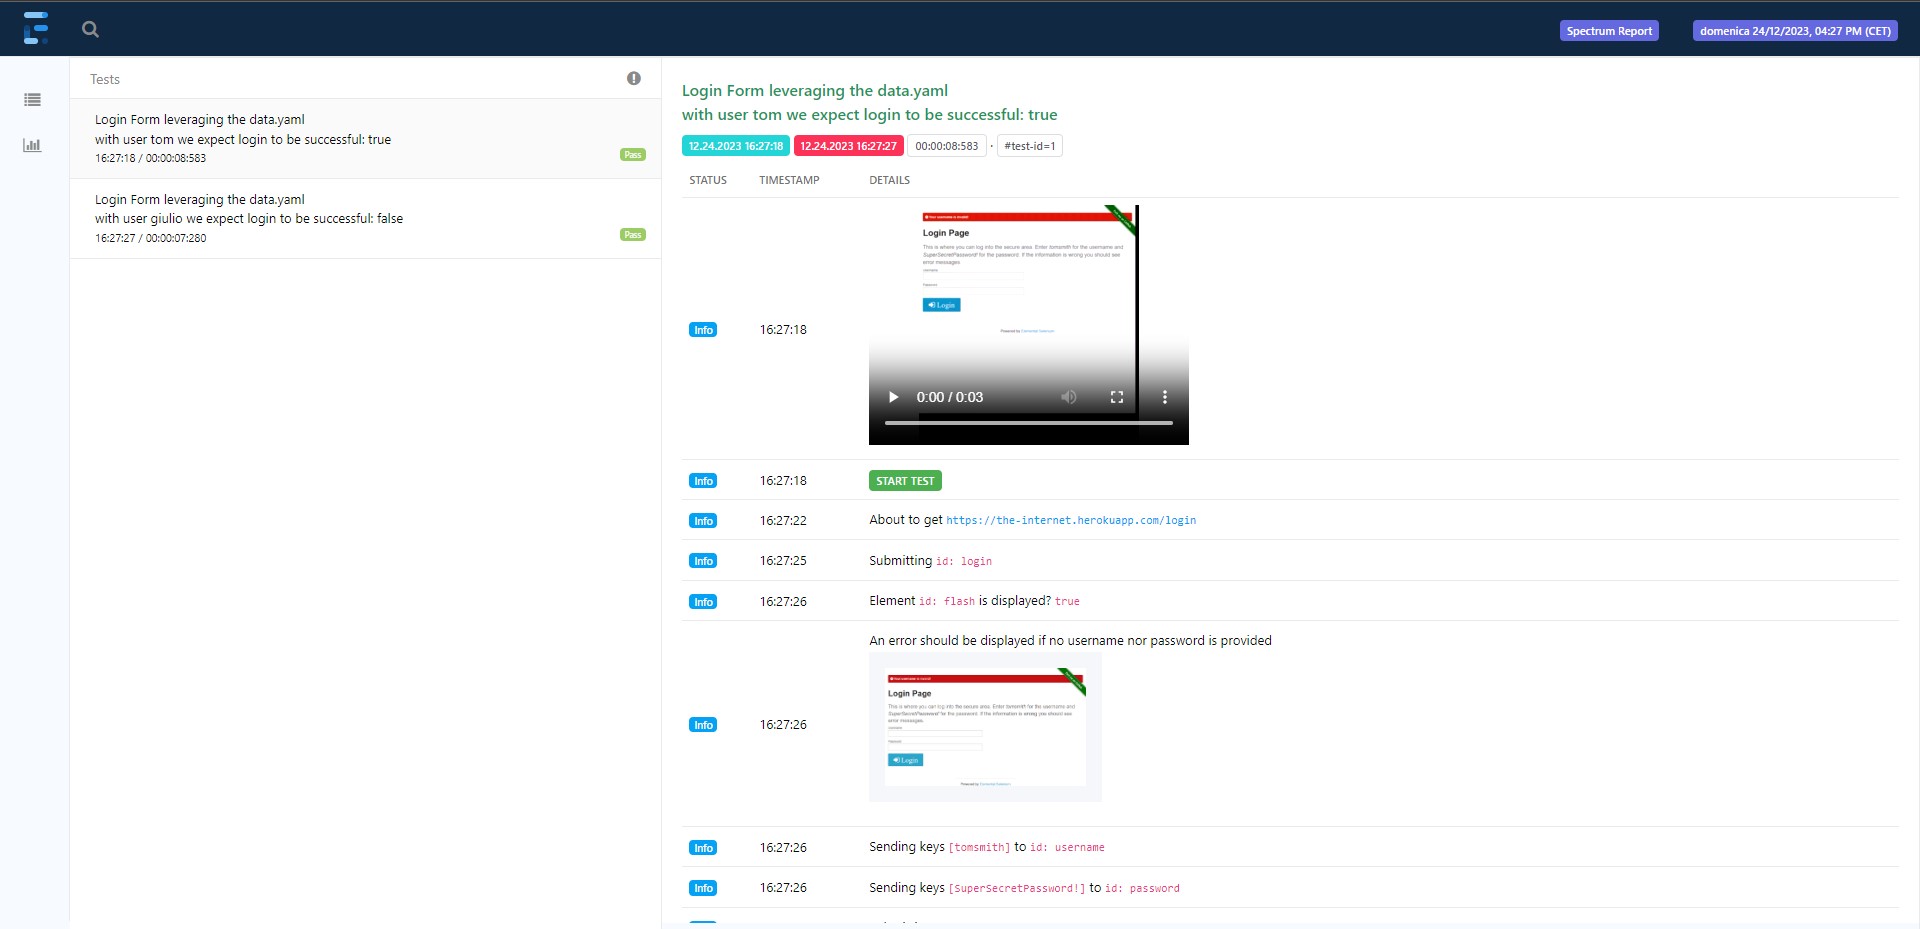
The video is sticky, meaning when you scroll down on the test steps it remains visible at the top of the page. Moreover, the video is synced with the steps: when you play it, the step currently displayed in the video is highlighted. You can also click on the steps and the video is sought to the corresponding point, as you can see in the video below:
To be precise, the video is generated from screenshots taken during the execution.
You can specify which screenshots to be used as frames providing one or more of these values in the video.frames field:
| Frame | Description |
|---|---|
| autoBefore | Screenshots taken before an event happening in the WebDriver |
| autoAfter | Screenshots taken after an event happening in the WebDriver |
| manual | Screenshots programmatically taken by you by invoking one of the SpectrumEntity Service Methods |
⚠️ Auto screenshots
Screenshots are taken automatically (withautoBeforeandautoAfter) according to the current log level and thedrivers.eventssettings. For example, if running with the defaultINFOlog level and the configuration below, no screenshot will be taken before clicking any element. It will when raising the log level atDEBUGor higher.
drivers:
  events:
    beforeClick:
      level: DEBUG  # Screenshots for this event are taken only when running at `DEBUG` level or higher
      message: Clicking on %1$s
💡 Tip
Setting bothautoBeforeandautoAfteris likely to be useless. In this flow, screenshots at bullets 3 and 4 will be equal:
- screenshot: before click
- click event
- → screenshot: after click
- → screenshot: before set text
- set text in input field
- screenshot: after set text
There might be cases where this is actually useful, though. For example, if those events are not consecutive.
If you’re not sure, you can leave bothautoBeforeandautoAfter: Spectrum will automatically discard consecutive duplicate frames by default. You can disable frame skipping by setting thevideo.skipDuplicateFramestofalse.
The video will be saved in the <extent.reportFolder>/<extent.fileName>/videos/<CLASS NAME>/<TEST NAME>
folder and attached to the Extent Report as well, where:
extent.reportFolder→target/spectrum/reportsby defaultextent.fileName→spectrum-report-${timestamp}.htmlby defaultCLASS NAME→ the test class’ simple nameTEST NAME→ the test method’s name
💡 Video Configuration Example
Here’s a quick example snippet. Remember you just need to provide fields with a value different from the corresponding one in the internal configuration.default.yaml:
video:
  frames:
    - autoAfter
    - manual
  skipDuplicateFrames: false
  extentTest:
    width: 640  # we want a bigger video tag in the report
    height: 480
⚠️ Video Frame Rate
Since the execution video is made up of screenshots, for performance reason it has a fixed rate of 1 frame per second. This allows to avoid encoding the same frame multiple times, while producing a very light video.
The consequence is that the video recorded does NOT replicate the actual timing of the test execution.
⚠️ Empty Video
When video recording is enabled but no frame was added to it, which might happen when no screenshot was taken according to the events configured and the current log level, a default “No Video” frame is added to it:

Artifacts Retention Policies
You can configure the retention policies for the artifacts produced by each execution. This includes:
- Extent reports
- Summary reports (both txt and html)
- TestBook reports (both txt and html)
For each, you can define a retention node like the one below.
As an example, let’s say we’d like to keep a total of 10 reports, of which at least 1 successful.
This means that, considering the last 10 executions, we can have one of these:
- 10 failed reports, if there are no successful ones at all, even before those, or
- 9 failed reports and 1 successful, if there was at least 1 successful execution, even if the last 10 runs failed, or
- a mixed number of failed and successful reports, if the last 10 executions are mixed.
So, when configured, a successful number of report(s), if present, are retained even if they’re older than the last total number of failed executions.
This is meant to have an evidence of the last successful run(s), even if there’s a long recent history of failed ones.
This snippet shows how to configure the example we just saw:
retention:
  total: 10
  successful: 1
Additionally, you can configure a number of days after which reports will be deleted. A successful number of reports, if present, will still be kept,
regardless of their age. Let’s make another example. Say we configured this:
retention:
  total: 5
  successful: 2
  days: 3
In this scenario:
- 2 successful reports (if present) will always be kept, regardless of the date they were produced: the last successful execution could have been 10 days ago, and with this configuration it will still be retained.
- Among young reports (those produced in the last 2 days as per this configuration), at most a total of 5 (if present) will be kept. These could be either successful or not.
- All remaining reports that are 3 or more days old will be deleted.
| Field Name | Default | Description |
|---|---|---|
| total | Integer.MAX_VALUE |
Number of reports to retain. Older ones will be deleted |
| successful | 0 | Number of successful reports to retain. Older ones will be deleted |
| days | Integer.MAX_VALUE |
Number of days after which reports will be deleted |
As you can see, by default no report will be deleted, regardless of the execution status. As a further example, this is how you can configure it for the extent report and testbook. Mind how you can have just the retention parameters you need, it’s not mandatory to use them all:
extent:
  retention:
    total: 10
    successful: 1
    days: 30

testBook:
  reporters:
    - html:
        retention:
          days: 10
    - txt:
        retention:
          total: 3
⚠️ Artifacts output folders
Mind that retention policies are applied to the whole folder where artifacts are produced. This means you should always generate reports in their own dedicated folder:
- one for extent reports
- one for html summaries
- one for txt summaries
- one for html testbook
- one for txt testbook
- …
If you use the same folder for many report kinds, the retention policy will not manage them correctly, possibly deleting files that should not be deleted. By default, such reports are already produced in dedicated folders.
Common Use Cases
Here you can find how Spectrum helps you in a few common use cases. If you think your use case is interesting and it would be worth sharing with the community, please open tell open a discussion in show and tell. We’ll evaluate to add it here as well.
File Upload
You can add files to be uploaded in the folder specified in the runtime.filesFolder node of the configuration*.yaml.
This is the default you can see in the internal
configuration.default.yaml:
runtime:
  filesFolder: src/test/resources/files
If you have these files in the configured folder:
root
└─ src
  └─ test
     └─ resources
        └─ files
           ├─ myFile.txt
           └─ document.pdf
and in the web page there’s an input field with type="file", you can leverage the upload method directly in any of your tests/pages like this:
public class HelloWorldIT extends SpectrumTest<Void> {

    private WebAppPage webAppPage;

    @Test
    public void myTest() {
        // Let's assume this is the input with type="file"
        WebElement fileUploadInput = webAppPage.getFileUploadInput();

        // leveraging method chaining, we upload the src/test/resources/files/myFile.txt
        webAppPage.open().upload(fileUploadInput, "myFile.txt");

        // Another example directly invoking the upload of src/test/resources/files/document.pdf
        upload(fileUploadInput, "document.pdf");
    }
}
💡 Example
Check the FilesIT.upload() test to see a real example
File Download
Files are downloaded in the folder specified in vars.downloadsFolder in the configuration*.yaml.
If needed, you should change this value since this is used in several places, for example in all the browsers’ capabilities.
So, this is a useful way to avoid redundancy and to be able to change all the values with one key.
When downloading a file from the AUT, you can leverage Spectrum to check if it’s what you expected. Technically speaking, checking the file’s content is beyond the goal of a Selenium test, which aims to check web applications, so its boundary is the driver.
Given a file downloaded from the AUT (so, in the vars.downloadsFolder),
Spectrum helps checking it by comparing its SHA 256 checksum with the checksum of a file in the folder specified in the runtime.filesFolder node of the configuration*.yaml.
Let’s explain this with an example. Let’s say that:
- you want to check a file downloaded with the name
downloadedFile.txt - you rely on the default
filesFolder, which issrc/test/resources/files
You need to place the expected file in that folder:
root
└─ src
  └─ test
     └─ resources
        └─ files
           └─ downloadedFile.txt
Now you can leverage the checkDownloadedFile(String) method like this:
public class HelloWorldIT extends SpectrumTest<Void> {

    private WebAppPage webAppPage;

    @Test
    public void myTest() {
        assertTrue(checkDownloadedFile("downloadedFile.txt"));
    }
}
If the two files are the same their checksum will match, and that assertion will pass.
In case you need to check a file with a different name, for example if the AUT generates files names dynamically,
you can leverage the overloaded checkDownloadedFile(String, String) method, which takes the names of both the downloaded file and the one to check:
public class HelloWorldIT extends SpectrumTest<Void> {

    private WebAppPage webAppPage;

    @Test
    public void myTest() {
        // Parameters order matters:
        //  - the first file will be searched in the downloadsFolder
        //  - the second file will be searched in the filesFolder
        assertTrue(checkDownloadedFile("downloadedFile.txt", "fileToCheck.txt"));
    }
}
Though this check might seem silly, it helps avoid regressions: whenever changes in the AUT lead to produce a different file,
for example more lines than before in an exported Excel, this is a way to signal something changed. If this is right, you just need to
store the newly expected file in the filesFolder.
Again, checking the file’s content is not in the scope of this kind of tests. Following the Excel example, you should instead focus on checking what led to having more lines: maybe there were more items shown in the web page, so you need to run assertions on those, or maybe it’s just something happening in the backend of your application. In this case, you should check with units and integration tests rather than with Selenium.
💡 Example
Check the FilesIT.download() test to see a real example
Data
As a general best practice, test code should only contain flow logic and assertions, while data should be kept outside. Spectrum embraces this by leveraging dedicated yaml files. This is completely optional, you can run all your tests without any data file.
By default, you can create data*.yaml files under the src/test/resources/data folder.
Data files will be loaded and merged following the same conventions of configurations*.yaml files.
💡 Example
When running tests with-Dspectrum.profiles=test, Spectrum will merge these files in this order of precedence:
- data.yaml
- data-test.yaml
For data files to be properly unmarshalled, you must create the corresponding POJOs.
Let’s see an example. Let’s say we want to test the AUT with two users having two different roles (admin and guest). Both will have the same set of params, such as a name and a password to login.
We need to take three steps:
- Create the yaml describing this scenario:
# data.yaml
users:
  admin:
    name: ada
    password: secret
  guest:
    name: bob
    password: pwd
- Create the POJO mapping the yaml above:
package your.package_name;

import lombok.Getter;

import java.util.Map;

@Getter
public class Data {

    private Map<String, User> users;

    @Getter
    public static class User {
        private String name;
        private String password;
    }
}
💡 Tip
TheUserclass in the snippet above is declared as a static inner class. This is not mandatory, you could have plain public classes in their own java file.
- Declare the Data class as generic in the SpectrumTest(s) and/or SpectrumPage(s) that will use it:
import io.github.giulong.spectrum.SpectrumTest;
import org.junit.jupiter.api.Test;
import your.package_name.Data;

public class SomeIT extends SpectrumTest<Data> { // <-- Mind the generic here

    @Test
    public void someTestMethod() {
        // We can now use the data object leveraging its getters.
        // No need to declare/instantiate the 'data' field: Spectrum is taking care of injecting it.
        // You can directly use it as it is here.
        data.getUsers().get("admin").getName();
    }
}
import io.github.giulong.spectrum.SpectrumPage;
import your.package_name.Data;

public class SomePage extends SpectrumPage<SomePage, Data> { // <-- Mind the generic here

    public void someServiceMethod() {
        data.getUsers().get("admin").getName();
    }
}
The Data generic must be specified only in classes actually using it. There’s no need to set it everywhere.
💡 Tip
For the sake of completeness, you can name theDataPOJO as you prefer. You can name itMySuperShinyWhatever.javaand have this as generic in you SpectrumTest(s):public class SomeIT extends SpectrumTest<MySuperShinyWhatever> {That said, I don’t really see any valid use case for this. Let me know if you see one. Probably, could be useful to have different Data classes to be used in different tests, so to have different and clearer names.
💡 Example: parameterized tests
Check the data.yaml and how it’s used in the LoginFormIT. Look for the usage ofdata.getUsers()in that class.
Datafaker
Datafaker
is a popular library to generate fake data. You can leverage the injected faker instance in both pages and tests:
@Test
void test() {
    String name = faker.name().fullName(); // Miss Samanta Schmidt
    String number = faker.numerify("##");
    String anotherNumber = faker.expression("#{numerify '##'}");
    ...
}
You can provide a custom random seed and a locale in your configuration*.yaml, for example:
faker:
  locale: it
  random: 24
The default in the internal configuration.default.yaml is the following, meaning if you need no random seed and the english locale you can avoid configuring it explicitly:
faker:
  locale: en
  random: null
Event Sourcing - Notifications
Spectrum leverages event sourcing, meaning throughout the execution it fires events at specific moments. These events are sent in broadcast to a list of consumers. Each consumer defines the events it’s interested into. Whenever an event is fired, any consumer interested into that is notified, performing the action it’s supposed to (more in the Events Consumers section below).
Each event defines a set of keys that consumers can use to define the events they want to be notified about. Most of them can be used in consumers with the type of match specified below:
| Field Name | Type | Match |
|---|---|---|
| primaryId | String | regex |
| secondaryId | String | regex |
| tags | Set<String> | exact |
| reason | String | regex |
| result | Result | exact |
| context | ExtensionContext | - |
Let’s see them in detail:
PrimaryId and SecondaryId
primaryId and secondaryId are strings through which you can identify each event. For example, for each test method, their value is:
primaryId→ <CLASS NAME>secondaryId→ <TEST NAME>
Let’s see what they mean with an example. Given the following test:
public class HelloWorldIT extends SpectrumTest<Void> {

    @Test
    public void dummyTest() {
        ...
    }
}
Spectrum will fire an event with:
primaryId→ “HelloWorldIT”secondaryId→ “dummyTest()” (Yes, the method name ends with the parenthesis)
If the @DisplayName is provided for either the class and/or the method, those will be used. Given:
@DisplayName("Class display name")
public class HelloWorldIT extends SpectrumTest<Void> {

    @Test
    @DisplayName("Method display name")
    public void dummyTest() {
        ...
    }
}
Spectrum will fire an event with:
primaryId→ “Class display name”secondaryId→ “Method display name”
Tags
Tags are a set of strings used to group events together. For example, all test methods will have the “test” tag. This way, instead of attaching a consumer to a specific event (with primary and secondary id, for example) you can listen to all events tagged in a particular way, such as all the tests.
💡 Example
Check theeventsConsumersin the configuration.default.yaml. Internal consumers need to take actions after each test is done, meaning they listen to events tagged with “test”:
eventsConsumers:
  - extentTest: # We need to add an entry to the Extent Report once each test is done
    events:
      - reason: after
        tags: [ test ]
Reason
Reason specifies why an event has been fired.
Result
This is the result of the executed test. Of course, this will be available only in events fired after tests execution, as per the table below.
Context
The JUnit’s ExtensionContext is attached to each event. It’s not considered when matching events, but it can be useful in custom templates to access objects stored in it. For example, the default slack.json template uses it to print class and test names:
"text": "*Name*\n*Class*: `${event.context.parent.get().displayName}`\n*Test*: `${event.context.displayName}`"
Events fired
Spectrum fires these events. The first column in the table below highlights the moment when that specific event is fired. The other columns are the event’s keys, with blank values being nulls.
| When | primaryId | secondaryId | tags | reason | result |
|---|---|---|---|---|---|
| Suite started | [suite] | before | |||
| Suite ended | [suite] | after | |||
| Class started (BeforeAll) | <CLASS NAME> | [class] | before | ||
| Class ended (AfterAll) | <CLASS NAME> | [class] | after | ||
| Test started (BeforeEach) | <CLASS NAME> | <TEST NAME> | [test] | before | |
| Test ended (AfterEach) | <CLASS NAME> | <TEST NAME> | [test] | after | NOT_RUN | SUCCESSFUL | FAILED | ABORTED | DISABLED |
💡 Tip
If you’re not sure about a particular event, when it’s fired and what are the actual values of its keys, you can always run with-Dspectrum.log.level=TRACEand look into logs. You’ll find something like “Dispatching event …”:
18:00:05.076 D EventsDispatcher          | Dispatching event Event(primaryId=null, secondaryId=null, tags=[suite], reason=before, result=null)
18:00:05.081 T EventsConsumer            | ExtentTestConsumer matchers for Event(primaryId=null, secondaryId=null, tags=[suite], reason=before, result=null)
18:00:05.081 T EventsConsumer            | reasonMatches: false
18:00:05.081 T EventsConsumer            | resultMatches: false
18:00:05.081 T EventsConsumer            | TestBookConsumer matchers for Event(primaryId=null, secondaryId=null, tags=[suite], reason=before, result=null)
18:00:05.081 T EventsConsumer            | reasonMatches: false
18:00:05.081 T EventsConsumer            | resultMatches: false
Custom Events
Since eventsDispatcher is injected in every SpectrumTest and SpectrumPage, you can programmatically send custom events and listen to them:
@DisplayName("Class display name")
public class HelloWorldIT extends SpectrumTest<Void> {

    @Test
    @DisplayName("Method display name")
    public void dummyTest() {
        eventsDispatcher.fire("myCustom primary Id", "my custom reason");
    }
}
💡 Example
Check the DemoIT.events() test to see how to fire custom events, and the related configuration.yaml to check howeventsConsumersare set, leveraging regex matches (more on this below).
Events Consumers
Time to understand what to do with events: we need consumers!
Given the events’ keys defined above, the consumers list will be looped to check if any of those is interested into being notified. This is done by comparing the fired event’s keys with each consumer’s events’ keys.
Here below are the checks applied. Order matters: as soon as a check is satisfied, the consumer is notified, and the subsequent checks will not be considered. Spectrum will proceed with inspecting the next consumer.
- reason and primaryId and secondaryId
- reason and just primaryId
- reason and tags
- result and primaryId and secondaryId
- result and just primaryId
- result and tags
⚠️ Matches applied
You can specify regexes to match Reason, primaryId, and secondaryId.
To match tags and result you need to provide the exact value.
⚠️ Tags matchers condition
In the conditions above, “tags” means that the set of tags of the fired event and the set of tags of the consumer event must intersect. This means that they don’t need to be all matching, it’s enough to have at least one match among all the tags. Few examples:
| Fired event’s tags | Consumer event’s tags | Match |
|---|---|---|
| [ tag1, tag2 ] | [ tag1, tag2 ] | ✅ tag1, tag2 |
| [ tag1, tag2 ] | [ tag2 ] | ✅ tag2 |
| [ tag1 ] | [ tag1, tag2 ] | ✅ tag1 |
| [ tag1, tag2 ] | [ tag666 ] | ❌ |
⚠️ Consumers exceptions
Each consumer handles events silently, meaning if any exception is thrown during the handling of an event, that will be logged and the execution of the tests will continue without breaking. This is meant to avoid that errors like network issues when sending an email can cause the whole suite to fail.
💡 Tip
You can configure how many consumers you need. Each consumer can listen to many events.
Let’s now see how to configure few consumers:
💡 Example: reason and primaryId and secondaryId
We want to send a Slack notification before and after a specific test, and an email just after:
eventsConsumers:
  - slack:
      events:
        - primaryId: Class Name
          secondaryId: test name
          reason: before
        - primaryId: Class Name
          secondaryId: test name
          reason: after
  - mail:
      events:
        - primaryId: Class Name
          secondaryId: test name
          reason: after
💡 Example: result and tags
We want to send a mail notification if the whole suite fails:
eventsConsumers:
  - mail:
      events:
        - result: FAILED
          tags: [ suite ]
💡 Example: custom event by primaryId and reason
eventsConsumers:
  - slack:
      events:
        - primaryId: primary.*  # every event which primaryId is starting with "primary"
          reason: custom-event
💡 Tip
Consumers send notification using templates that leverage FreeMarker. You can do the same in your custom templates, by accessing and evaluating all the event’s fields directly in the template, and apply logic, if needed.
💡 Tip
You may add how many consumers you want, so if you want to use different templates just add different consumers and provide a template for each. Otherwise, if you set many events on the same consumer, they will share the template.
Mail Consumer
You can leverage this consumer to send email notifications.
Spectrum uses Simple java Mail,
and you can configure it with the file src/test/resources/simplejavamail.properties, as specified in
the docs.
For example, to send an email via GMail, you can use these properties by replacing placeholders with actual values:
simplejavamail.transportstrategy=SMTP_TLS
simplejavamail.smtp.host=smtp.gmail.com
simplejavamail.smtp.port=587
simplejavamail.smtp.username=<YOUR GMAIL ADDRESS>
simplejavamail.smtp.password=<YOUR GMAIL APP PASSWORD>
simplejavamail.defaults.trustedhosts=smtp.gmail.com
simplejavamail.defaults.subject=Spectrum Notification
simplejavamail.defaults.from.address=<YOUR GMAIL ADDRESS>
simplejavamail.defaults.to.name=<RECIPIENT NAME>
simplejavamail.defaults.to.address=<RECIPIENT EMAIL ADDRESS>
Actual configurations of any email provider to be used are out of scope. For the provided snippet, check Google’s docs on how to generate an app password.
Check Simple java Mail’s docs to see all the available properties.
⚠️ Mail Template
The default mail.html template can either be used to notify about single tests or the whole suite result, as per the snippet below. You can use both or just the one you prefer.
eventsConsumers:
  - mail:
      events:
        - reason: after
          tags: [ test ]
  - mail:
      events:
        - reason: after
          tags: [ suite ]
The default template is pretty basic, as you can see. The first is the test example, while the second is the suite result notification:
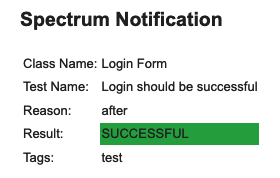
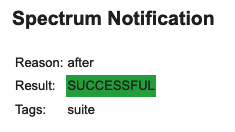
If you want to provide a custom template there are two ways:
- provide a template with a custom name under
src/test/resources/templates:
eventsConsumers:
  - mail:
      template: my-template.txt # The extension doesn't really matter.
      events:
        - reason: after
          tags: [ test ]
- simply create the file
src/test/resources/templates/mail.html. This will override the internal default, so there’s no need to explicitly provide thetemplateparameter.
💡 Tip
You may add how many consumers you want, so if you want to use different templates just add different consumers and provide a template for each. Otherwise, if you set many events on the same consumer, they will share the template.
You can also specify a list of attachments, by providing:
- the name they will have in the email
- the path to the file
For example, it’s useful to send the html report and/or testbook when the suite is complete:
eventsConsumers:
  - mail:
      events:
        - reason: after
          tags: [ suite ]
      attachments:
        - name: report
          file: target/spectrum/inline-reports/report.html
        - name: testbook
          file: target/spectrum/testbook/testbook.html
⚠️ Mail Attachments
Mind that, like in the snippet above, attachments are specified at consumer level. This means for all the events of a specific consumer, all the attachments will be sent. If you need to send different sets of attachments, provide different consumers:
eventsConsumers:
  - mail:
      events:
        - reason: after
          tags: [ suite ]
      attachments:
        - name: report
          file: target/spectrum/inline-reports/report.html
  - mail:
      events:
        - reason: after
          tags: [ class ]
      attachments:
        - name: attachment
          file: path/to/attachment
Slack Consumer
A few steps are needed to configure your Slack Workspace to receive notifications from Spectrum:
- You need to log in and create an app from here by following these steps:
- click on the Create New App button:
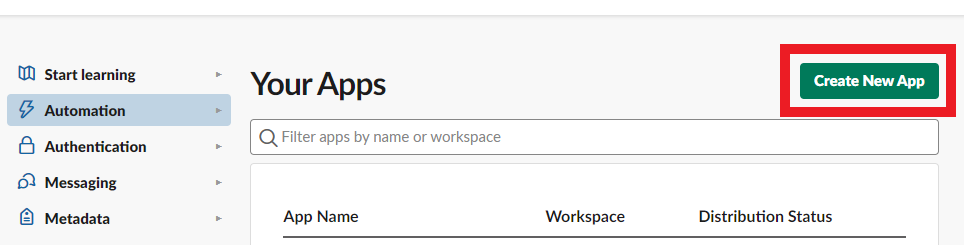
- choose to create it from an app manifest
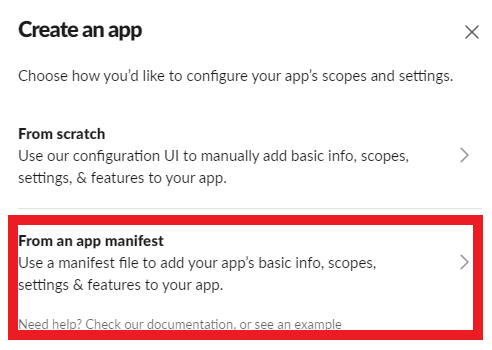
-
Select your workspace, delete the default yaml manifest and copy this one:
display_information: name: Spectrum description: Notification from Spectrum Selenium Framework background_color: "#2c2d30" features: bot_user: display_name: Spectrum always_online: false oauth_config: scopes: bot: - channels:read - chat:write - incoming-webhook settings: org_deploy_enabled: false socket_mode_enabled: false token_rotation_enabled: false - Click on Next and then Create
- click on the Create New App button:
- You should have been redirected to the Basic Information page of the newly created app. From there:
- Install the app to Workspace:
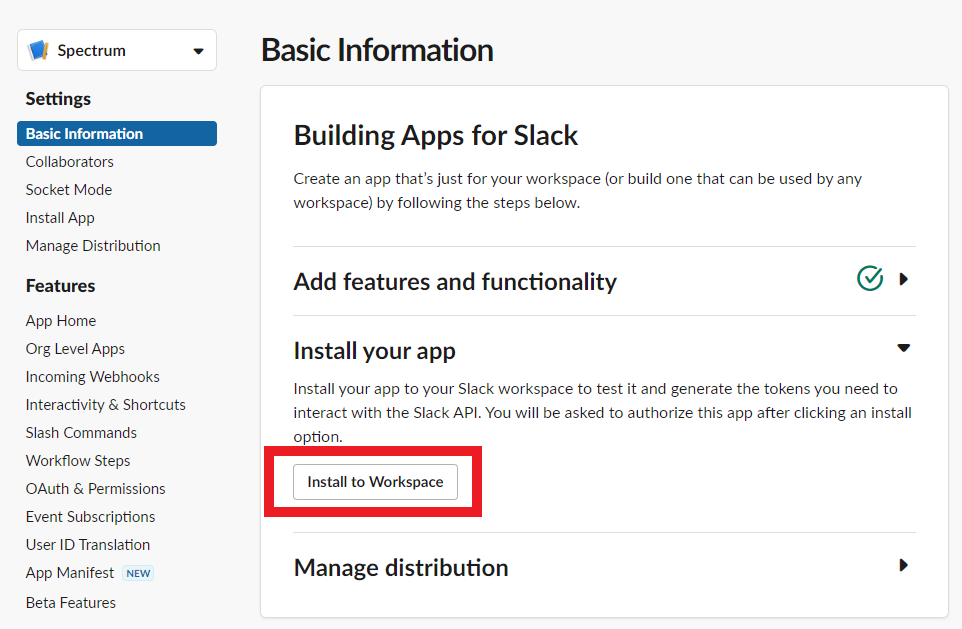
- Choose the channel where you want to receive the notifications and click Allow:
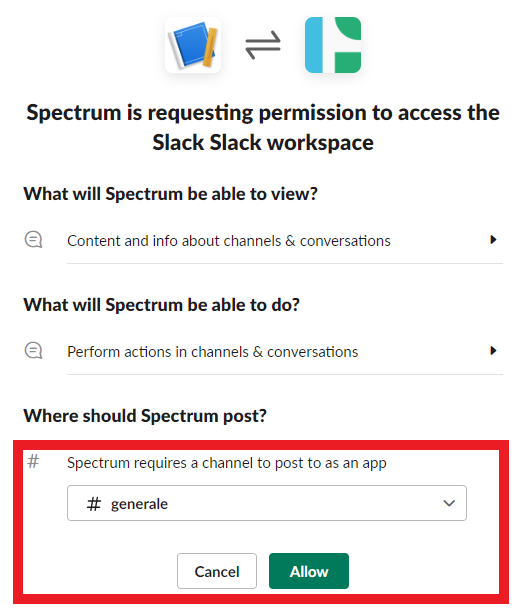
- Install the app to Workspace:
- Go in the OAuth & Permissions page and copy the Bot User OAuth Token. You will need this in the
configuration*.yaml(see last bullet)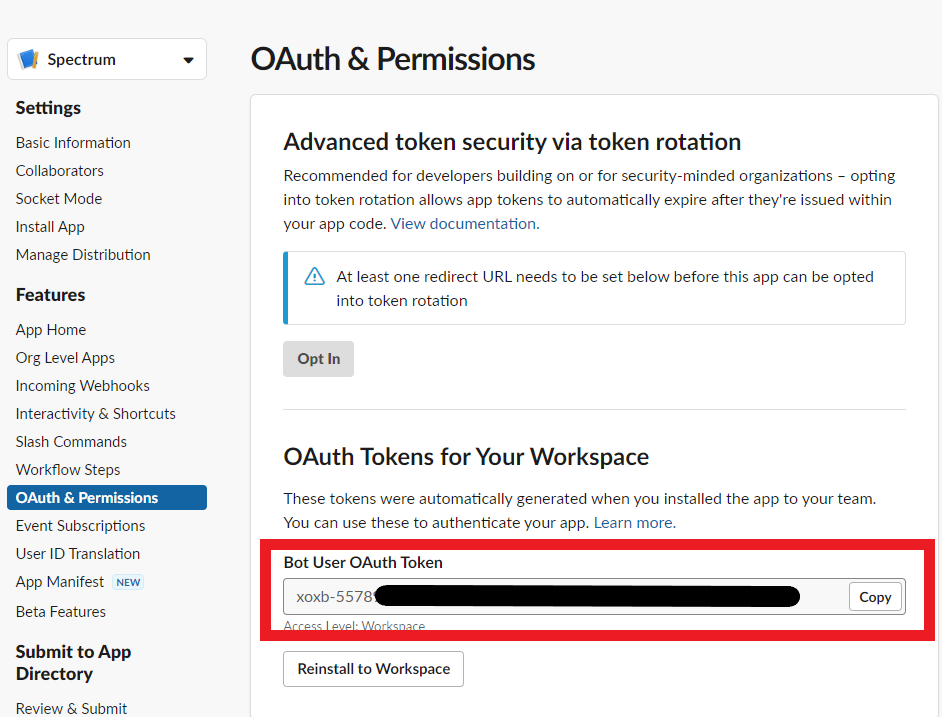
- In Slack:
- open the channel you chose in the previous steps and invite the Spectrum app by sending this message:
/invite @Spectrum. You should see this after sending it:

- right-click on the channel you chose in the previous steps and select View channel details:
- copy the Channel ID from the details overlay:
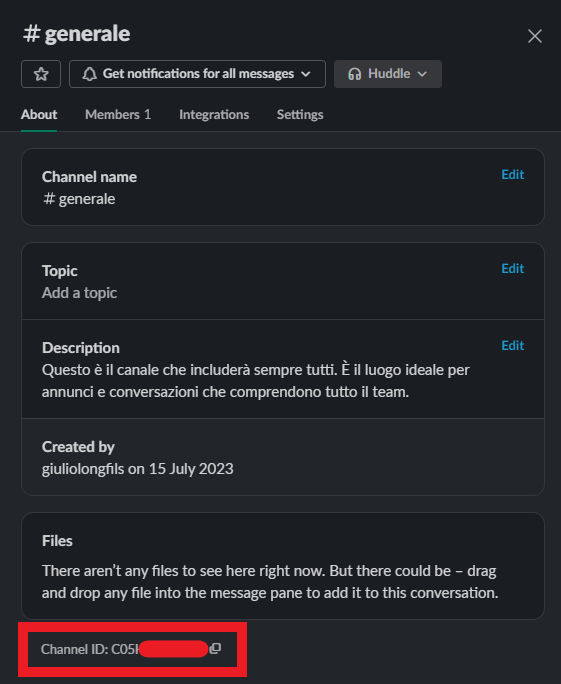
- open the channel you chose in the previous steps and invite the Spectrum app by sending this message:
-
Configure the Slack consumer(s) in your
configuration*.yamlby providing the token and the Channel ID from the previous steps:eventsConsumers: - slack: token: xoxb-*** channel: C05*** template: slack-suite.json events: - reason: before tags: [ suite ] - If everything is configured correctly, with the consumer above you should receive a notification at the very beginning of your test suite.
⚠️ Slack Template
The default slack.json template is meant to be used to notify about each test result, as per the snippet below. It might not be correctly interpolated if used on other events.
eventsConsumers:
  - slack:
      events:
        - reason: after
          tags: [ test ]
If you want to provide a custom template there are two ways:
- provide a template with a custom name under
src/test/resources/templates:
eventsConsumers:
  - slack:
      template: my-template.txt # The extension doesn't really matter.
      events:
        - reason: after
          tags: [ test ]
- simply create the file
src/test/resources/templates/slack.json. This will override the internal default, so there’s no need to explicitly provide the path.
💡 Tip
To test the slack handler works as expected, you can provide a simpletemplate.txtwith just an “Hello World from Spectrum” in it.
Test Steps Consumer
You can leverage this consumer to have a minimalistic report with the list of web driver’s events, along with the time at which they were fired and the time delta between each. To have one generated for each test, you need to declare this:
eventsConsumers:
  - testSteps:
      events:
        - reason: after
          tags: [ test, dynamicTest ]
⚠️ Template and output path
By default, the test-steps.txt template is used. If you want to provide a custom template there are two ways:
- provide a template with a custom name under
src/test/resources/templates:
eventsConsumers:
  - testSteps:
      template: my-template.html # The report produced will match the template's extension.
      output: target/spectrum/tests-steps # This is the default output path, no need to set it unless you want to change it.
      events:
        - reason: after
          tags: [ test, dynamicTest ]
- simply create the file
src/test/resources/templates/test-steps.txt. This will override the internal default, so there’s no need to explicitly provide the path.The template is interpolated with FreeMarker. All the steps recorded are exposed in the
stepsvariable and each is mapped onto the TestStep.java template.
By default, a report like this will be produced:
Time                       | Time taken | Message
----------------------------------------------------------------------------------------------------
2024-11-30T21:53:00.516414 |     0.400s | About to get https://the-internet.herokuapp.com/
2024-11-30T21:53:02.849405 |     2.332s | Text of tag name: h1 is 'Welcome to the-internet'
2024-11-30T21:53:02.870003 |     0.200s | Clicking on link text: Checkboxes
2024-11-30T21:53:03.053361 |     0.183s | Element css selector: #checkboxes -> tag name: input is selected? false
2024-11-30T21:53:03.067100 |     0.130s | Element css selector: #checkboxes -> tag name: input is selected? true
2024-11-30T21:53:03.067445 |     0.000s | Clicking on css selector: #checkboxes -> tag name: input
2024-11-30T21:53:03.291913 |     0.224s | Element css selector: #checkboxes -> tag name: input is selected? true
💡 Tip
Remember you can customise the messages logged: take a look at the WebDriver Events Listener section.
⚠️ Tags
This consumer is specific to single tests, so it won’t work on tags other thantestanddynamicTest.
Log Consumer
You can leverage this consumer to log a message. For instance, to hook it on a custom event, you can declare this:
eventsConsumers:
  - log:
      events:
        - primaryId: primary.*  # custom event by primaryId regex
          reason: custom-event
⚠️ Template
By default, the log.txt template is used. If you want to provide a custom template there are two ways:
- provide a template with a custom name under
src/test/resources/templates:
eventsConsumers:
  - log:
      template: my-template.txt
      events:
        - primaryId: primary.*
          reason: custom-event
- simply create the file
src/test/resources/templates/log.txt. This will override the internal default, so there’s no need to explicitly provide the path.The template is interpolated with FreeMarker. The event is exposed in the
eventvariable.
By default, a message like this is logged:
Class Name: Checkbox Page
Test Name : testWithNoDisplayName()
Reason    : after
Result    : SUCCESSFUL
Tags      : test
Execution Summary
You can optionally have Spectrum generate an execution summary by providing one or more summary reporters. This is the default summary in the internal configuration.default.yaml.
summary:
  reporters: [ ] # List of reporters that will produce the summary in specific formats
  condition: ${successfulPercentage} == 100 # Execution successful if all tests are successful
The suite execution is considered successful based on the condition you provide. By default, all tests must end successfully.
The condition is evaluated leveraging FreeMarker,
meaning you can write complex conditions using the variables briefly explained below. They’re all put in the vars map in the
Summary.java.
⚠️ FreeMarker
Explaining how FreeMarker works, and how to take the most out of it, goes beyond the goal of this doc. Please check its own docs.
💡 Tip
Since the testBook’s quality gate status is added to the vars used when evaluating the summary’s condition, you can indirectly bind those two by having this:
summary:
  condition: ${qgStatus}
As an example, this is how you can have a html summary:
summary:
  reporters:
    - html:
        output: ${summaryReportOutput}/summary.html
Summary Reporters
💡 Tip
This section is very similar to the TestBook Reporters one, since they leverage the same objects 😉
All the reporters below have default values for their parameters, which means you can just configure them as empty objects like:
reporters:
  - log: { }
  - txt: { }
  - html: { }
Of course, they’re all optional: you can add just those you want.
Below you will find the output produced by the default internal template for each reporter. Those are the real outputs produced when running Spectrum’s own e2e tests you can find in the it-testbook module.
If you want, you can provide a custom template of yours. As for all the other templates (such as those used in events consumers), you can leverage FreeMarker.
For each reporter:
- the snippets below will contain all the customisable parameters for each reporter
- values reported in the snippets below are the defaults (no need to provide them)
templateis a path relative tosrc/test/resourcesoutputis the path relative to the project’s root, and might contain the${timestamp}placeholderretentionspecifies which and how many reports to keep for each reporteropenAtEndspecifies, for reporters that produce a file, if you want it to be automatically opened when the suite execution is finished
Log Summary Reporter
This is the internal logReporter.yaml:
log:
  template: summary.txt
Here is the output produced by the default internal template, for tests of the it-testbook module:
#############################################################################################################
                                         EXECUTION SUMMARY
#############################################################################################################

  Status           |   Count | Percent |
-------------------------------------------------------------------------------------------------------------
  Successful tests |     6/8 |     75% | <==================================================>
  Failed tests     |     1/8 |   12.5% | <========>
  Aborted tests    |     0/8 |      0% | <>
  Skipped tests    |     1/8 |   12.5% | <========>

  Execution Time
-------------------------------------------------------------------------------------------------------------
  Started at: 2024 Jan 13 22:20:37
  Ended at:   2024 Jan 13 22:21:00
  Duration:   00:00:23

  Result
-------------------------------------------------------------------------------------------------------------
  Condition: ${successfulPercentage} == 100
  Evaluated: 75 == 100
  Result:    KO
-------------------------------------------------------------------------------------------------------------
#############################################################################################################
Txt Summary Reporter
This is the internal txtReporter.yaml:
txt:
  template: summary.txt
  output: ${summaryReportOutput}/summary-${timestamp}.txt
  retention: { }
  openAtEnd: false
For the sake of completeness, the output file was manually copied here. It’s the same that is logged, but saved to a dedicated file, so that you can send it as an attachment in an email, for example. Or you can provide different templates to log a shorter report and send the full thing to a file, it’s up to you!
Html Summary Reporter
This is the internal htmlReporter.yaml:
html:
  template: summary.html
  output: ${summaryReportOutput}/summary-${timestamp}.html
  retention: { }
  openAtEnd: false
For the sake of completeness, the output file was manually copied here. This is what it looks like when opened in a browser:
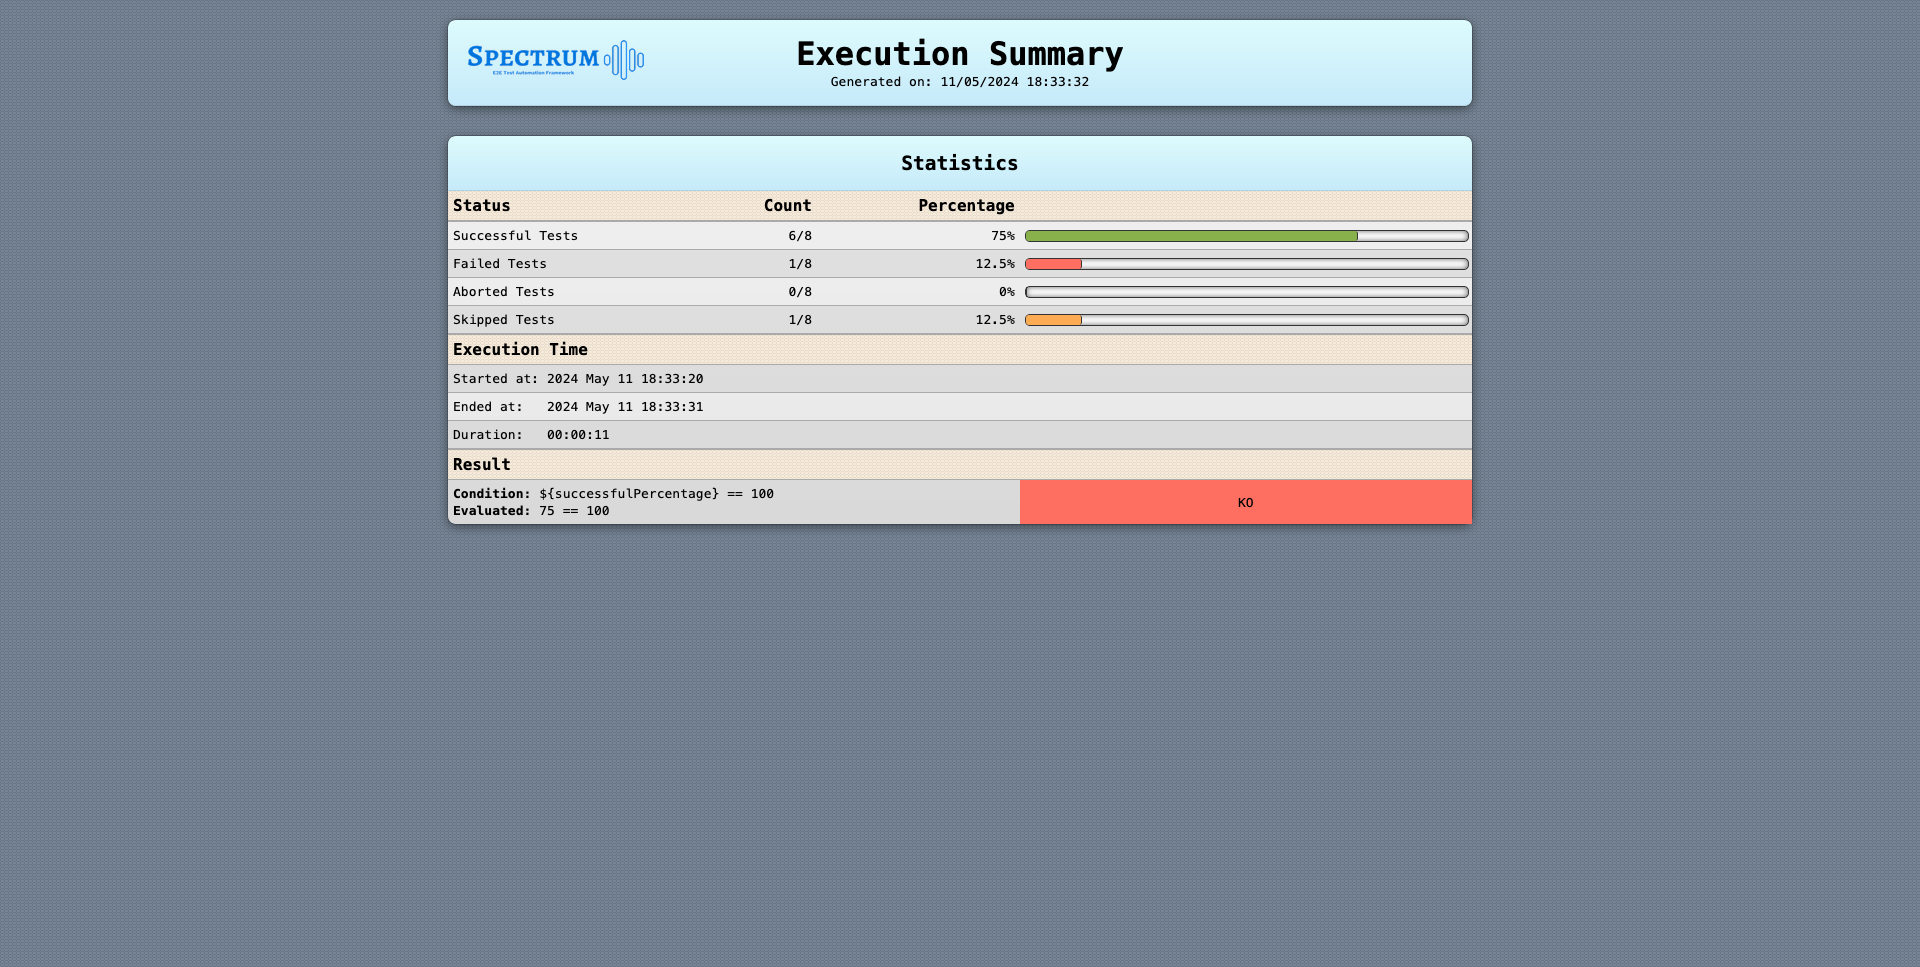
Beside the default template, these are already available, you just need to pick the corresponding template:
- summary-pies.html that leverages Google Charts
html:
  template: summary-pies.html
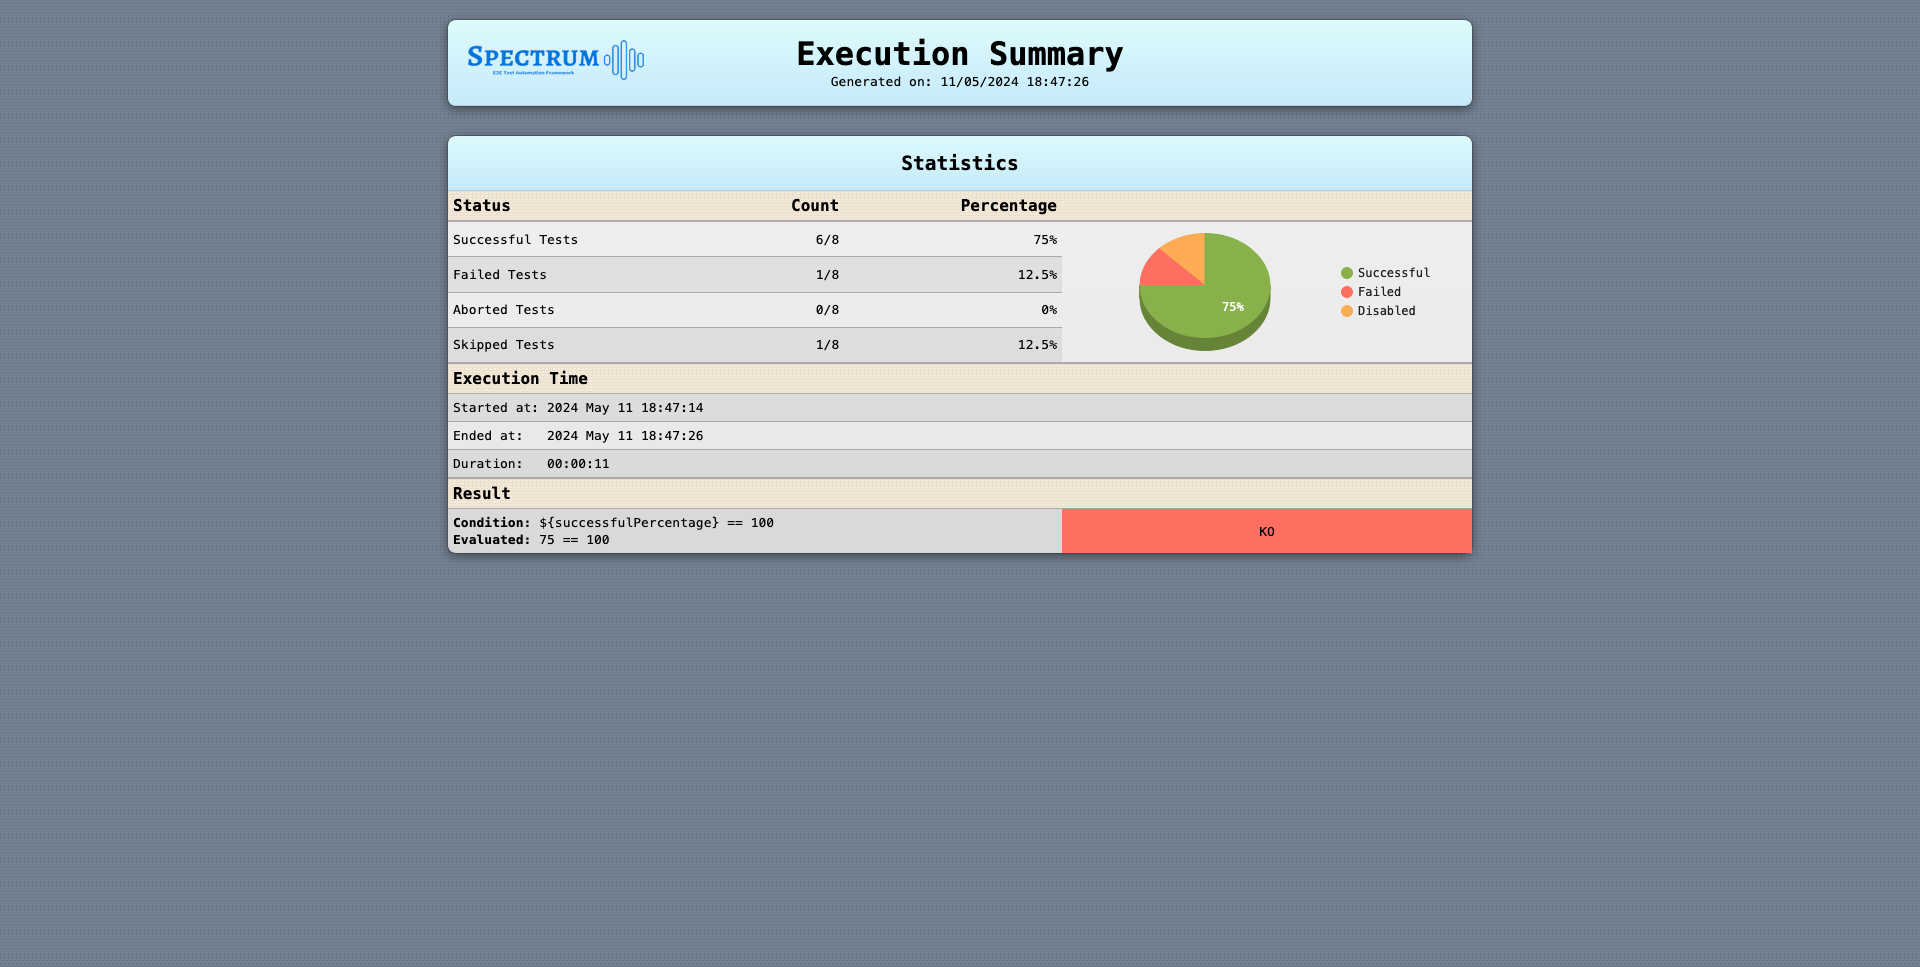
TestBook - Coverage
Talking about coverage for e2e tests is not so straightforward. Coverage makes sense for unit tests, since they directly run against methods, so it’s easy to check which lines were covered during the execution. On the other hand, e2e tests run against a long living instance of the AUT, with no visibility on the source code.
As e2e tests are tied to the business functionalities of the AUT, so should be their coverage. Spectrum helps you to keep track of which functionalities are covered by parsing a testbook, in which you can declare all the tests of your full suite. When running them, Spectrum will check which were actually executed and which not, generating a dedicated report in several formats of your choice.
These are the information needed in a testbook:
| Field | Type | Default | Mandatory | Description |
|---|---|---|---|---|
| Class Name | String | null | ✅ | enclosing class name |
| Test Name | String | null | ✅ | name of the test method |
| Weight | int | 1 | ❌ | optional number representing the importance of the related test, with regards to all the others |
In short, we need to uniquely identify each test by their class name and method name. Method name alone is not enough, since there might be test methods with the same name in different classes.
You can also give a weight to each test: you can give a higher weight to those tests that are meant to check functionalities of the AUT that are more important or critical. In the report produced, tests will be also aggregated considering their weights. In this way, the final coverage percentage varies based on the weights, meaning critical functionalities will have a higher impact on the outcome.
Additionally, you can set a Quality Gate, which is a boolean condition that will be evaluated to mark the suite as successful or not.
These are the testbook parameters you need to configure:
| Parameter | Description |
|---|---|
| qualityGate | object holding the condition to be evaluated to consider the execution successful or failed |
| parser | object specifying the format of the provided testbook |
| reporters | list of objects to specify which kind of report(s) to produce |
Quality Gate
The QG node has only one property, which is the boolean condition to be evaluated:
qualityGate:
  condition: ${weightedSuccessful.percentage} > 60
The example above means that the execution is considered successful if more than 60% of the weighted tests are successful.
The condition is evaluated leveraging FreeMarker,
meaning you can write complex conditions using the variables briefly explained below. They’re all put in the vars map in the
TestBook.java.
⚠️ FreeMarker
Explaining how FreeMarker works, and how to take the most out of it, goes beyond the goal of this doc. Please check its own docs.
Generic variables:
| Variable | Description |
|---|---|
| mappedTests | map of tests executed and found in the provided testbook |
| unmappedTests | map of tests executed but not found in the provided testbook |
| groupedMappedTests | like mappedTests, but grouped by class names |
| groupedUnmappedTests | like unmappedTests, but grouped by class names |
| statistics | object containing all the object reported in the lists below, plus additional ones |
| qg | qualityGate node from configuration*.yaml |
| timestamp | when the testbook was generated |
Each key in the lists below is an instance of the inner static class
Statistics,
and it holds both a total int field and a percentage double field. For example, given the successful key here below, you can access:
${successful.total}${successful.percentage}
Statistics of tests mapped in the testbook:
- successful
- failed
- aborted
- disabled
- notRun
Statistics of tests, mapped or not in the provided testbook, based on their weights:
- grandSuccessful
- grandFailed
- grandAborted
- grandDisabled
- grandNotRun
Statistics of tests mapped in the testbook, based on their weights
- weightedSuccessful
- weightedFailed
- weightedAborted
- weightedDisabled
- weightedNotRun
Statistics of all tests, mapped or not in the testbook, based on their weights
- grandWeightedSuccessful
- grandWeightedFailed
- grandWeightedAborted
- grandWeightedDisabled
- grandWeightedNotRun
💡 Tip
It’s hard to explain and grasp each of these vars. The best way is to:
- check the default html template and the default txt template
- run your suite with the html reporter and/or the txt reporter as explained below
- check the outcome
TestBook Parsers
Txt TestBook Parser
You can provide a txt file where each line is in this format:
<CLASS NAME>::<TEST NAME>##<WEIGHT>
For example:
test class::my test
another class::another test
another class::weighted test##123
The first and second rows above maps just a class name and a test name, while the third provides also an explicit weight.
Csv TestBook Parser
You can provide a csv file where each line is in this format:
<CLASS NAME>,<TEST NAME>,<WEIGHT>
For example:
test class,my test
another class,another test
another class,weighted test,123
The first and second rows above maps just a class name and a test name, while the third provides also an explicit weight.
Yaml TestBook Parser
You can provide a yaml file where you have class names as keys in the root of the file. Each of those is mapped to a list of objects made of two fields:
- name
- weight (optional)
For example:
test class:
  - name: my test

another class:
  - name: another test
  - name: weighted test
    weight: 123
TestBook Reporters
💡 Tip
This section is very similar to the Summary Reporters one, since they leverage the same objects 😉
All the reporters below have default values for their parameters, which means you can just configure them as empty objects like:
reporters:
  - log: { }
  - txt: { }
  - html: { }
Of course, they’re all optional: you can add just those you want.
Below you will find the output produced by the default internal template for each reporter. Those are the real outputs produced when running Spectrum’s own e2e tests you can find in the it-testbook module. This means you can:
- check the it_testbook’s module testbook.yaml
- check the actual it_testbook’s module tests and
especially their
@DisplayName - look at the produced reports shown below for each reporter
⚠️ it-testbook module’s reports
The default templates have aMapped TestsandUnmapped Testssections at the bottom, in which tests are grouped by their classes.As you will see from the reports produced below, the
testbook.yamlused in theit-testbookmodule maps tests that are not present in the suite.This means all those will be shown in the
Mapped TestsasNot Run, while all the tests actually executed will appear in theUnmapped Testssection with their respective results.
If you want, you can provide a custom template of yours. As for all the other templates (such as those used in events consumers), you can leverage FreeMarker.
For each reporter:
- the snippets below will contain all the customisable parameters for each reporter
- values reported in the snippets below are the defaults (no need to provide them)
templateis a path relative tosrc/test/resourcesoutputis the path relative to the project’s root, and might contain the${timestamp}placeholderretentionspecifies which and how many reports to keep for each reporteropenAtEndspecifies, for reporters that produce a file, if you want it to be automatically opened when the suite execution is finished
Log TestBook Reporter
This is the internal logReporter.yaml:
log:
  template: testbook.txt
Here is the output produced by the default internal template, for tests of the it-testbook module:
##########################################################################################################

                                        SPECTRUM TESTBOOK RESULTS
                                    Generated on: 30/07/2023 15:40:35

##########################################################################################################

STATISTICS
----------------------------------------------------------------------------------------------------------
Mapped Tests:                      4
Unmapped Tests:                    8
Grand Total:              4 + 8 = 12
Total Weighted:                    7
Grand Total Weighted:     7 + 8 = 15
----------------------------------------------------------------------------------------------------------

MAPPED WEIGHTED TESTS RATIO
[Ratio of tests mapped in the TestBook, based on their weights]
----------------------------------------------------------------------------------------------------------
Successful:     0/7      0% <>
Failed:         0/7      0% <>
Aborted:        0/7      0% <>
Disabled:       0/7      0% <>
Not run:        7/7    100% <==================================================================>
----------------------------------------------------------------------------------------------------------

GRAND TOTAL WEIGHTED TESTS RATIO
[Ratio of all tests, mapped or not, based on their weights]
----------------------------------------------------------------------------------------------------------
Successful:    6/15     40% <==========================>
Failed:        1/15   6.67% <====>
Aborted:       0/15      0% <>
Disabled:      1/15   6.67% <====>
Not run:       7/15  46.67% <===============================>
----------------------------------------------------------------------------------------------------------

MAPPED TESTS RATIO
[Ratio of tests mapped in the TestBook]
----------------------------------------------------------------------------------------------------------
Successful:     0/4      0% <>
Failed:         0/4      0% <>
Aborted:        0/4      0% <>
Disabled:       0/4      0% <>
Not run:        4/4    100% <==================================================================>
----------------------------------------------------------------------------------------------------------

GRAND TOTAL TESTS RATIO
[Ratio of tests, mapped or not, based on their weights]
----------------------------------------------------------------------------------------------------------
Successful:    6/12     50% <=================================>
Failed:        1/12   8.33% <=====>
Aborted:       0/12      0% <>
Disabled:      1/12   8.33% <=====>
Not run:       4/12  33.33% <======================>
----------------------------------------------------------------------------------------------------------

QUALITY GATE:
----------------------------------------------------------------------------------------------------------
| Condition: ${weightedSuccessful.percentage} > 60
| Evaluated: 0 > 60
| Result:    KO
----------------------------------------------------------------------------------------------------------
MAPPED TESTS:
----------------------------------------------------------------------------------------------------------
| Test Name                                                                        | Weight | Result     |
| Hello World Selenium-------------------------------------------------------------|--------|------------|
|   - Successful                                                                   |      1 | Not Run    |
|   - This is my first selenium!                                                   |      2 | Not Run    |
|   - another test                                                                 |      3 | Not Run    |
----------------------------------------------------------------------------------------------------------
| Test Name                                                                        | Weight | Result     |
| Second Class---------------------------------------------------------------------|--------|------------|
|   - skipped                                                                      |      1 | Not Run    |
----------------------------------------------------------------------------------------------------------
----------------------------------------------------------------------------------------------------------

UNMAPPED TESTS:
----------------------------------------------------------------------------------------------------------
| Test Name                                                                        | Weight | Result     |
| Demo test------------------------------------------------------------------------|--------|------------|
|   - Skipped Test                                                                 |      1 | Disabled   |
|   - Sending custom events                                                        |      1 | Successful |
|   - This one should fail for demonstration purposes                              |      1 | Failed     |
----------------------------------------------------------------------------------------------------------
| Test Name                                                                        | Weight | Result     |
| Login Form leveraging the data.yaml----------------------------------------------|--------|------------|
|   - with user giulio we expect login to be successful: false                     |      1 | Successful |
|   - with user tom we expect login to be successful: true                         |      1 | Successful |
----------------------------------------------------------------------------------------------------------
| Test Name                                                                        | Weight | Result     |
| Files Test-----------------------------------------------------------------------|--------|------------|
|   - upload                                                                       |      1 | Successful |
|   - download                                                                     |      1 | Successful |
----------------------------------------------------------------------------------------------------------
| Test Name                                                                        | Weight | Result     |
| Checkbox Page--------------------------------------------------------------------|--------|------------|
|   - testWithNoDisplayName()                                                      |      1 | Successful |
----------------------------------------------------------------------------------------------------------
----------------------------------------------------------------------------------------------------------

##########################################################################################################
Txt TestBook Reporter
This is the internal txtReporter.yaml:
txt:
  template: testbook.txt
  output: ${testBookReportOutput}/testbook-${timestamp}.txt
  retention: { }
  openAtEnd: false
For the sake of completeness, the output file was manually copied here. It’s the same that is logged, but saved to a dedicated file, so that you can send it as an attachment in an email, for example. Or you can provide different templates to log a shorter report and send the full thing to a file, it’s up to you!
Html TestBook Reporter
This is the internal htmlReporter.yaml:
html:
  template: testbook.html
  output: ${testBookReportOutput}/testBook-${timestamp}.html
  retention: { }
  openAtEnd: false
For the sake of completeness, the output file was manually copied here. This is what it looks like when opened in a browser:
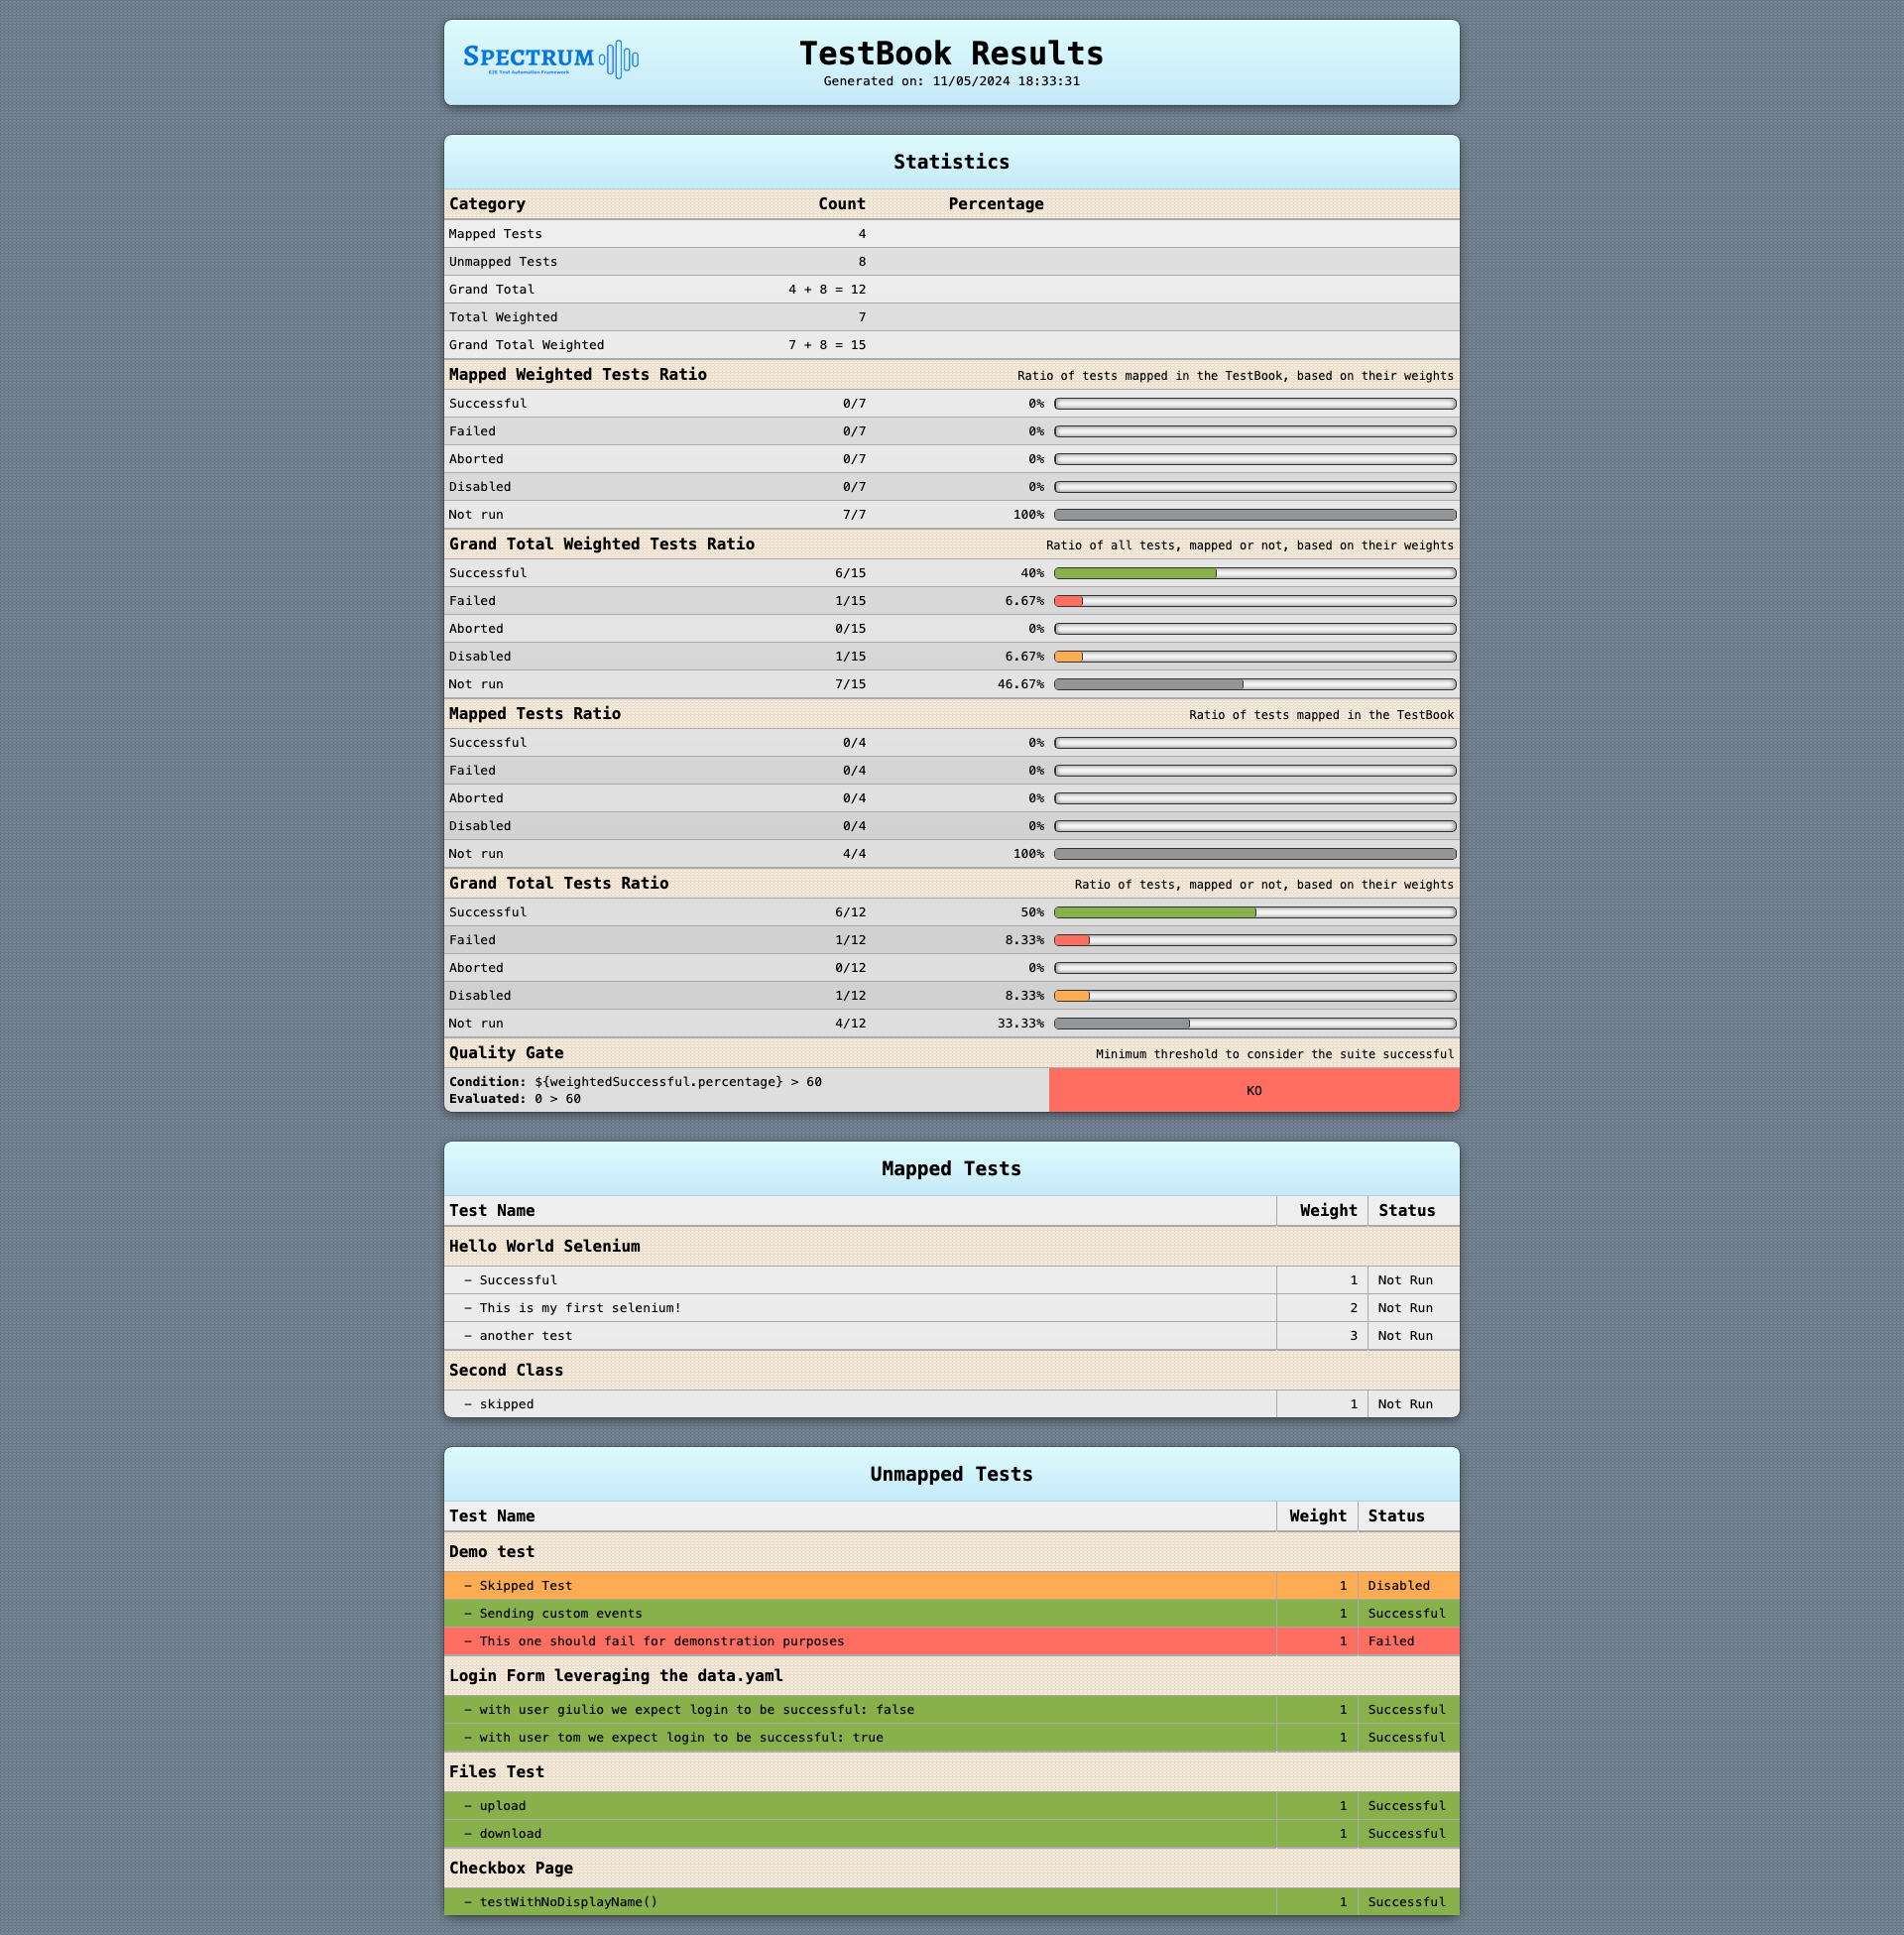
Beside the default template, these are already available, you just need to pick the corresponding template:
- testbook-pies.html that leverages Google Charts
html:
  template: testbook-pies.html
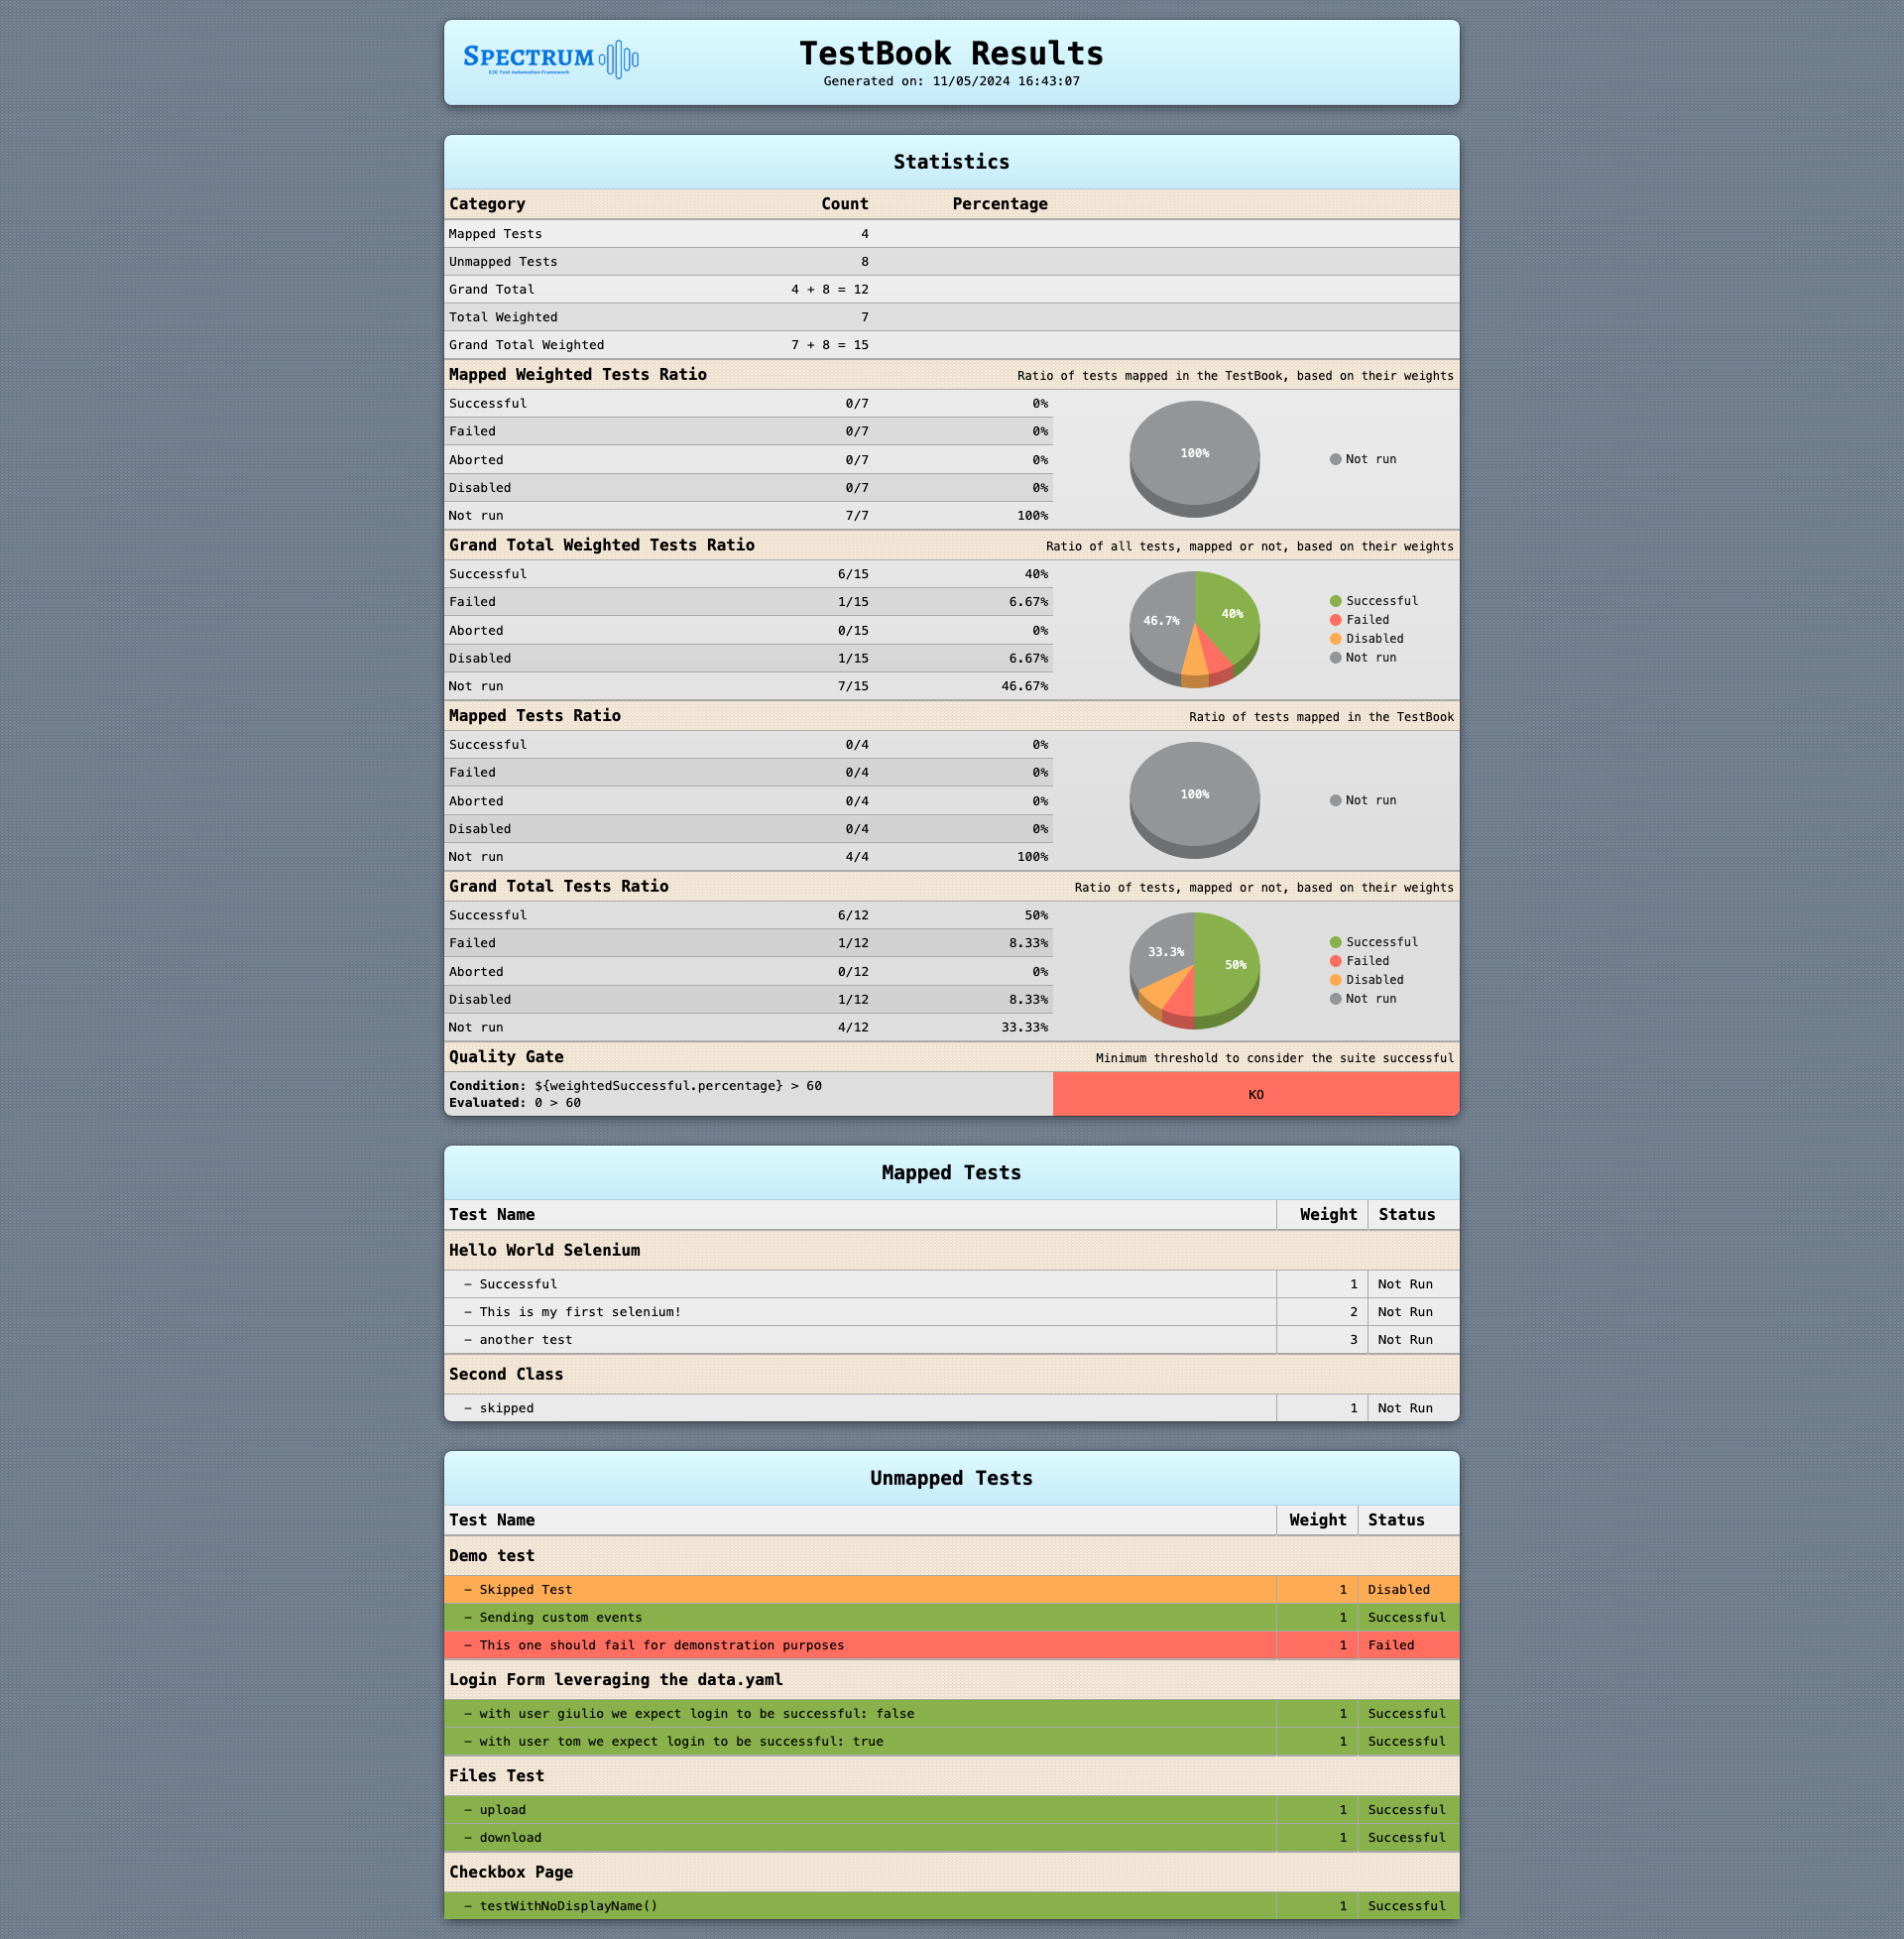
Default TestBook
The one below is the testBook in the internal configuration.default.yaml. As you can see, it has a quality gate already set, as well as a yaml parser but no reporters.
# internal configuration.default.yaml
testBook:
  qualityGate:
    condition: ${weightedSuccessful.percentage} > 60  # Execution successful if more than 60% of the weighted tests are successful
  parser:
    yaml:
      path: testbook.yaml # we provided the yaml testbook in src/test/resources/testbook.yaml
  reporters: [ ] # List of testBook reporters that will produce the execution report in specific formats
In your configuration.yaml you need to provide the reporters you want:
testBook:
  reporters:
    - log: { }  # the report will be logged
    - html:
        output: ${testBookReportOutput}/testbook.html # a html report will be produced at this path
Full TestBook Examples
testBook:
  qualityGate:
    condition: ${weightedSuccessful.percentage} > 60  # Execution successful if more than 60% of the weighted tests are successful
  parser:
    yaml:
      path: testbook.yaml # we provided the yaml testbook in src/test/resources/testbook.yaml
  reporters:
    - log: { }  # the report will be logged
    - txt:
        output: ${testBookReportOutput}/testbook.txt # a text report will be produced at this path
    - html:
        output: ${testBookReportOutput}/testbook.html # a html report will be produced at this path
testBook:
  qualityGate:
    condition: ${weightedSuccessful.percentage} > 60  # Execution successful if more than 60% of the weighted tests are successful
  parser:
    yaml:
      path: testbook.yaml # we provided the yaml testbook in src/test/resources/testbook.yaml
  reporters:
    - txt:
        template: template.txt  # we want to produce a text report based on a custom template in src/test/resources/templates
    - html:
        template: my-custom-template.html # src/test/resources/templates/my-custom-template.html
        output: some/path/testbook.html # a html report will be produced at this path
testBook:
  qualityGate:
    condition: ${weightedSuccessful.percentage} > 40 || ${failed} < 10  # We want the testbook to be marked as successful if we have at least 40% of successful weighted tests or less than 10 tests (not considering their weights!!) failed
  parser:
    txt:
      path: testbook.txt # we provided the yaml testbook in src/test/resources/testbook.txt
  reporters:
    - log: { }  # we just want the report to be logged
Parallel Execution
Spectrum tests can be run in parallel by leveraging JUnit Parallel Execution
Cache
Spectrum caches a <PROJECT NAME>-metadata.json file to store some cross-executions metadata, such as the last successful executions.
The <PROJECT NAME> prefix ensures to avoid clashes between different projects that use Spectrum in your workspace.
This is purely internal implementation and you should never edit that file manually.
Still, you can specify its location via the runtime.cacheFolder parameter in your configuration.yaml.
The default value, as you can see in the internal
configuration.default.yaml,
is ${user.home}/.cache/spectrum
Banner
If you want to customise the banner logged at the beginning of each execution,
you just need to place a file named src/test/resources/banner.txt in your project. It’s interpolated with
FreeMarker, and these are the variables you can use:
| Variable | Value |
|---|---|
| ${name} | spectrum |
| ${version} | Spectrum version, such as 1.8.1 |
| ${url} | https://github.com/giulong/spectrum |
Project Structure
Let’s see how your project will look like. Few assumptions for this example:
- you defined base values plus three profiles, each with its own set of Data:
- [base] →
configuration.yaml+data.yaml - local →
configuration-local.yaml+data-local.yaml - test →
configuration-test.yaml+data-test.yaml - uat →
configuration-uat.yaml+data-uat.yaml
- [base] →
- you configured the yaml testbook parser, which will read the
testbook.yaml - you configured both a html and a txt testbook reporters, which will produce
testbook.htmlandtestbook.txtreports - you configured the extent report to have a fixed name with:
extent.fileName: report.html
root
└─ src
|  └─ test
|     ├─ java
|     |  └─ com.your.tests
|     |     └─ ...
|     └─ resources
|        ├─ data
|        |  ├─ data.yaml
|        |  ├─ data-local.yaml
|        |  ├─ data-test.yaml
|        |  └─ data-uat.yaml
|        ├─ configuration.yaml
|        ├─ configuration-local.yaml
|        ├─ configuration-test.yaml
|        ├─ configuration-uat.yaml
|        └─ testbook.yaml
├─ target
|  └─ spectrum
|     |─ logs
|     |  └─ spectrum.log   # rotated daily
|     |─ reports
|     |  └─ report         # each report is in its own folder
|     |     |─ screenshots    # folder where screenshots are saved
|     |     |─ videos         # folder where videos are saved
|     |     └─ report.html    # by default the name ends with the timestamp
|     └─ testbook
|        |─ testbook.html  # by default the name ends with the timestamp
|        └─ testbook.txt   # by default the name ends with the timestamp
└─ pom.xml
Bugs Report and Feature Requests
Found a bug? Want to request a new feature? Just follow these links and provide the requested details:
If you’re not sure about what to ask, or for anything else related to Spectrum, you can also choose a proper discussion category.
Releases
You can find details about Spectrum releases here.
If you’re using Spectrum, please consider giving it a GitHub Star ⭐